Creating an Integration System User and Group
In the Search field enter
Create Integration System Userand select the Create Integration System User task.Enter a username and password for the new Integration System User. You will need to enter these into 1Password SaaS Manager when you connect the Workday report.
Make sure that Require New Password at Next Sign In is unchecked
Set Session Timeout Minutes to
0.Check Do not allow UI Sessions.
To assign permissions in Workday you should also create an Integration System Security Group.
- In the Search field enter
Create Security Groupand select the Create Security Group task. - Choose Integration System Security Group (Unconstrained) from the Type of Tenanted Security Group dropdown list.
- Enter a name (for example
SaaSManager-sg) and create the group. - Assign the Integration Security User you just created to the new group in the Group Criteria section.
Assigning permissions to the group
In the Search field enter Domain Security Configuration and select the Domain Security Configuration task.
The next steps will be repeated for a series of domains. The domains are:
- Workday Accounts
- Worker Data Public Worker Reports
- Person Data Work Contact Information
- Worker Data Current Staffing Information
- Worker Data All Positions
- Worker Data Business Title on Worker Profile
For each of the domains listed above:
- Search for the domain, click the “…” next to the domain name, and select Actions > Domain > Edit Security Policy Permissions.
- Under Integrated Permissions, add the security group you just created (
SaaSManager-sg) and select the checkbox in the Get column. - Select OK and then Done.
Once you have added all the domains you need, you can consent to the Activate Pending Security Policy Changes prompt.
If you are not prompted then search for Activate Pending Security Policy Changes in the Search field, enter a comment, and check Confirm.
This action is required to put the security policy changes into effect.
Creating your report
Click Reporting & Analytics > Create Custom Report
Set Report Type to Advanced (only Advanced custom reports can be used for RaaS).
Make sure Enable as Web Service and Optimized for Performance is checked.
Choose Purchase Orders as the Data Source.
Click OK.
Under Additional Info select the Columns tab.
Click the + button to add each column to the report.
Purchase_OrderPurchase order number Purchase_Order_DateDate (yyyy-mm-dd) Purchase_Order_Statusfor example Issued (optional) Payment_StatusOptional SupplierVendor name Receiving_Statusfor example Fully Received (optional) Invoicing_Statusfor example Partially Invoiced (optional) Purchase_Order_Line_groupExtended_AmountLine item amount CurrencyLine item currency Line_Item_DescriptionDescription QuantityQuantity Unit_CostUnit cost Unit_of_Measurefor example Each or User (optional) Line_MemoDetailed description (optional) Cost_CenterCost center (optional) Service_Line_Start_DateStart of contract (yyyy-mm-dd, optional) Service_Line_End_DateEnd of contract (yyyy-mm-dd, optional)
Adding prompts and filters
Prompts
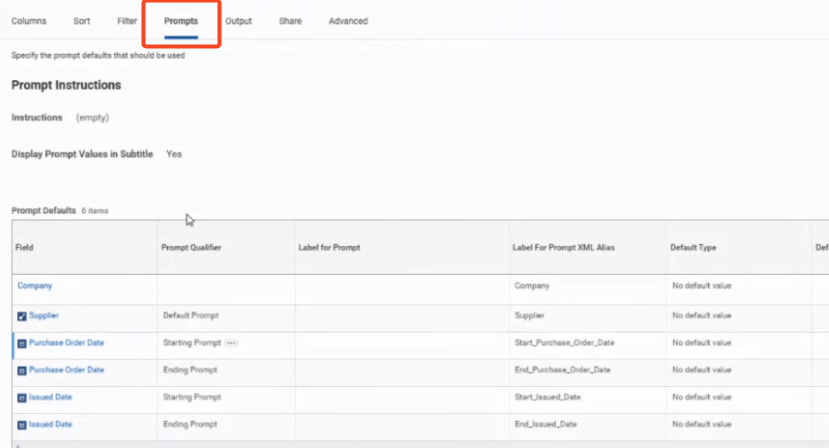
SaaS Manager needs to request POs or spend transactions with a last modified date or a transaction date between a certain range. Your report will need to include prompts for:
- Start date
- End date
Note the Label for Prompt XML Alias value for these fields as you will need to enter them into SaaS Manager when connecting to the report.
Filters
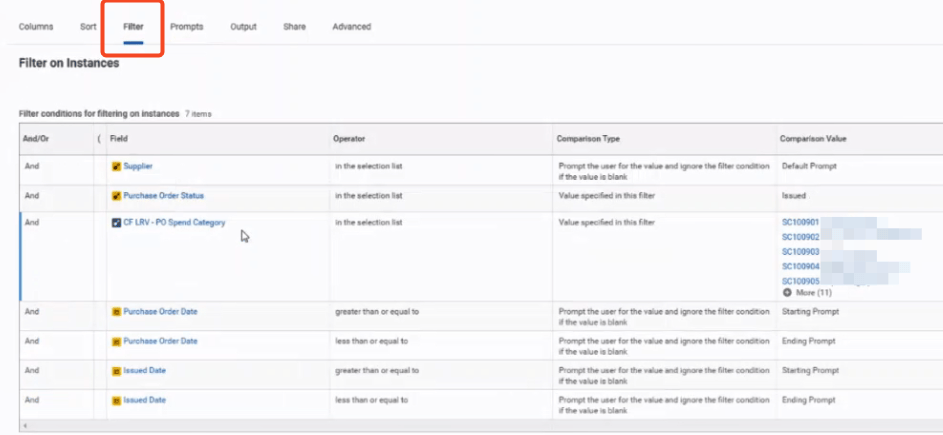
You will need to apply logic to filter the report based on the prompt values.
At minimum this will need to include:
- PO last modified date (or transaction date) ≥ Start date prompt
- PO last modified date (or transaction date) < End date prompt
Sharing your report with the group
Once you’ve created your report click the Share tab in the Additional Info section.
- Look at the Report Definition Sharing Options section, and choose Share with specific authorized groups and users.
- Enter the username of the Integration System User you created earlier into the Authorized Users field.
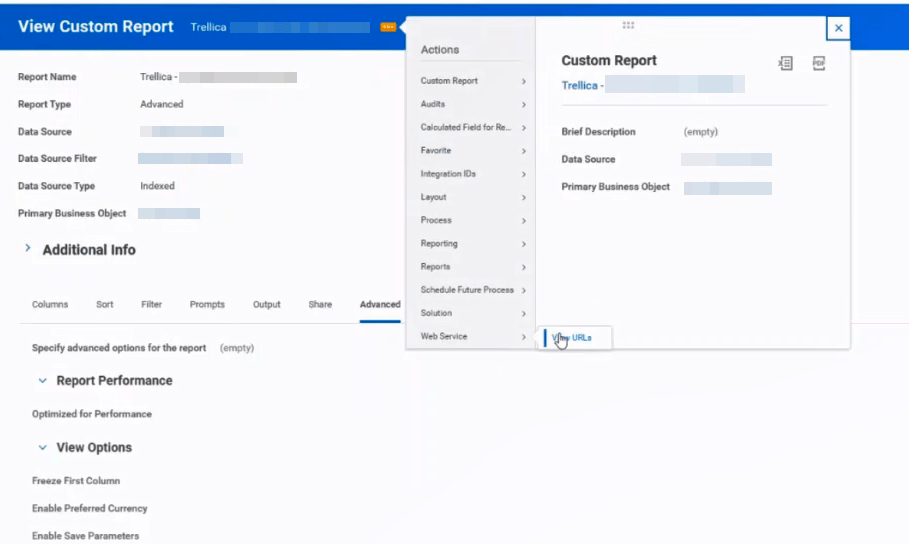
- Now choose Actions > Web Service > View URLs.
- In the JSON section, right-click JSON and select Copy URL.
Finalizing configuration
Send a sample of the JSON to SaaS Manager to finalize configuration.
Note
Also double check that filter prompts are configured for:
- PO last modified date (or transaction date) ≥ Start date prompt
- PO last modified date (or transaction date) < End date prompt
Was this article helpful?
Glad to hear it! If you have anything you'd like to add, feel free to contact us.
Sorry to hear that. Please contact us if you'd like to provide more details.