You can connect 1Passwords SaaS Manager to your finance system to import spend data and match transactions to apps in your inventory. Spend data for each app is recorded in your Apps inventory and displayed in your Spend dashboard.
Note
Set up a spend integration
SaaS Manager offers integrations with multiple widely used finance systems, including NetSuite, Xero and Expensify. If your system isn’t currently supported, contact SaaS Manager support.
To find out more about setting up a particular integration, select Integration help on the integration page or see the integration-specific help.
Finance systems contain a range of data, some of which may be sensitive. SaaS Manager limits its access to the roles or permissions required to import your SaaS spend data. For more details about the access SaaS Manager requires, select the information icon next to each permission.
Limit imports to specific spend categories
When you connect to a source of financial data, SaaS Manager looks for spend category codes that might relate to SaaS or software spend. You can add or remove categories from this list. SaaS Manager will only import transactions from the categories that you have selected.
If you have turned on Expensed and Invoiced spend on the Spend Settings page, you can specify whether transactions from each category should be recorded as invoiced or expensed spend. Note that not all integrations support differentiating between spends. The following integrations support this capability:
- BILL Spend & Expense
- Brex
- Dynamics 365 Business Central
- Expensify
- Navan
- Odoo
- Pleo
- QuickBooks
- Ramp
- Sage Intacct
- SAP Concur
- Workday Purchase Order data
You can also choose whether to import journal entries.
Note
Process flow
This diagram describes the requests made when connecting to finance systems:
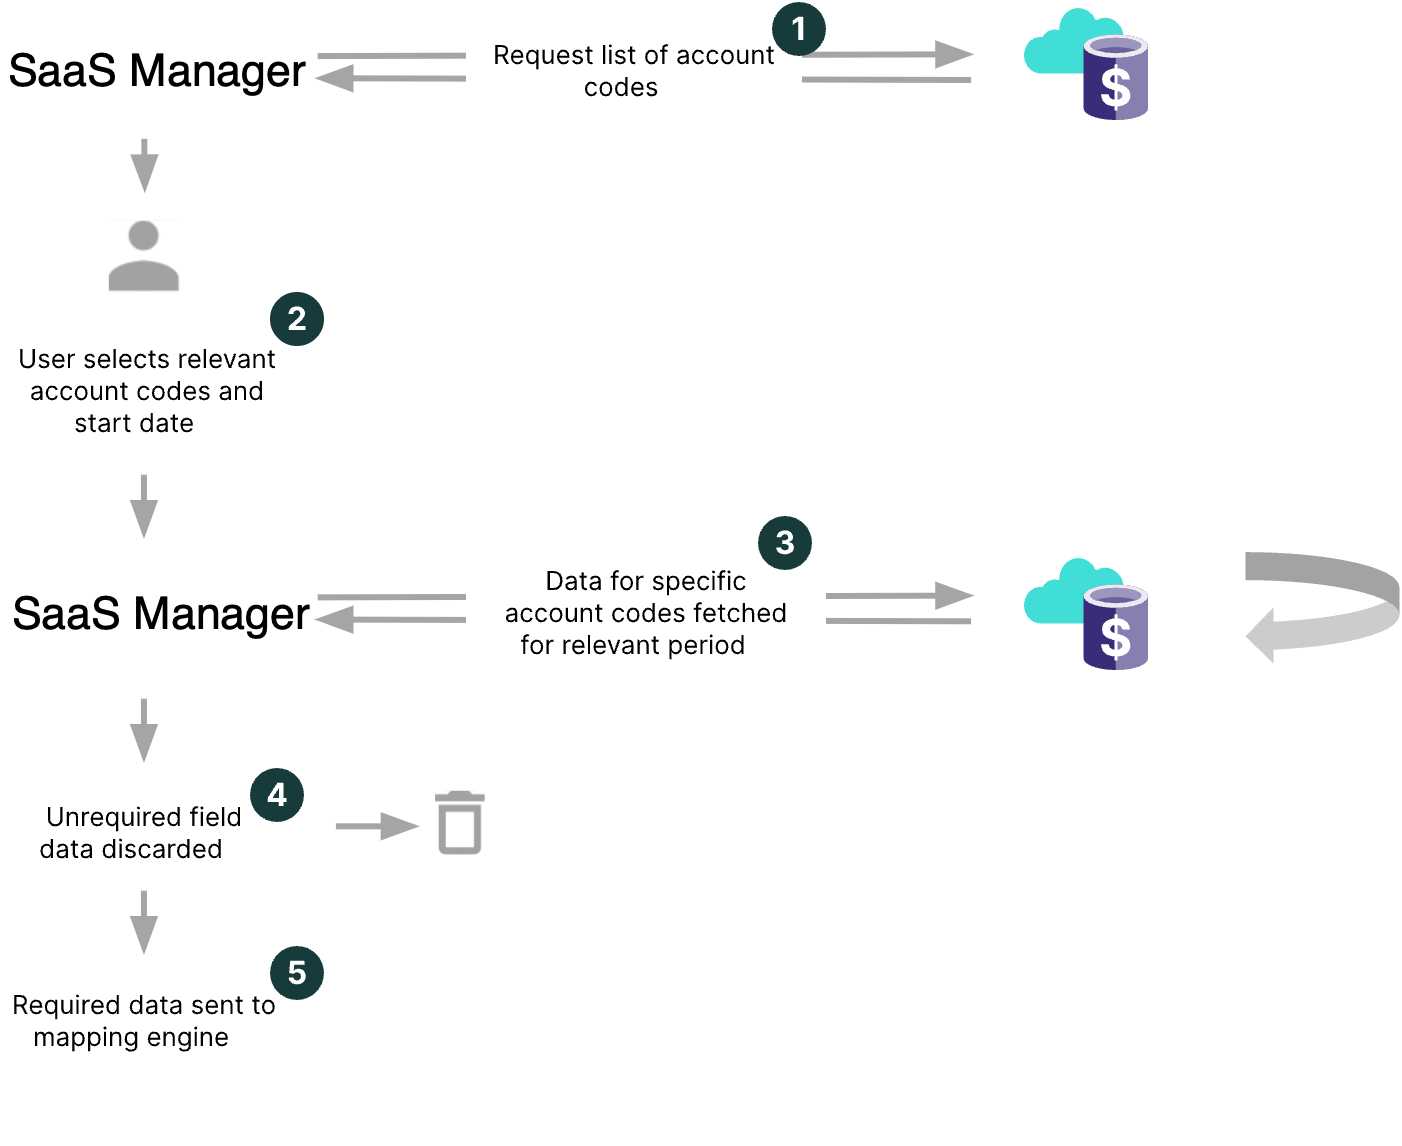
- SaaS Manager retrieves a list of account codes from the target app.
- The user configuring the connection selects codes related to software spend and sets the start date for pulling that data.
- SaaS Manager explicitly queries the app for just those account codes from the specified date.
- Although SaaS Manager only needs a small number of fields, APIs typically return additional data. SaaS Manager only stores the fields it needs and discards any additional data.
- Data is sent to our mapping engine to try to find matches against our catalog of over 16,000 SaaS apps and vendors.
The integration is then refreshed automatically on a schedule, which is weekly by default, to pull transactions that have changed or been added since the previous run.
For each transaction, SaaS Manager stores the following details:
| Name | Status | Detail |
|---|---|---|
| Transaction ID | Mandatory | Unique ID for the transaction so that SaaS Manager doesn’t fetch duplicate data |
| Billing Date | Mandatory | Date the transaction took place |
| Amount | Mandatory | Value of transaction |
| Currency Code | Optional | Required if the system reports data in multiple currencies |
| Description | Mandatory | Label for the transaction |
| Account Code | Mandatory | GL code or Account code |
| Vendor Name | Optional | Some systems split out the vendor name from the description field |
| Expensed By | Optional | The email address or name of the individual claiming the expense |
| Cost Center | Optional | Associated cost center for the transaction |
| Period Start / End | Optional | Start and end, for amortization |
| Note | Optional | Memo field |
View and map transactions
After you’ve imported your transactions into SaaS Manager, you can view them by going to the Spend page and selecting the relevant data source.
Where possible, SaaS Manager automatically maps each spend transaction to an app. The total spend to date and details of the mapped transactions are listed on the relevant app page.
Sometimes the description for a transaction is ambiguous or unclear. For example, “Atlassian” doesn’t tell us which Atlassian product the transaction relates to. In this case, you’ll need to map the transactions manually. As part of this process, you can define rules so that SaaS Manager can map these transactions automatically in future.
For more information, see Review spend transactions.
Refresh spend data
After the first import, SaaS Manager queries the finance system for new or updated transactions once a week. To check for changes manually, open the integrations page for the finance system and select Refresh.
To force a full refresh of all spend data, expand the context menu, select Settings > Reconnect to resave the current settings. This will force a full refresh for the spend categories and period requested.
Next steps
Once you have set up an integration to your finance system, the next step is to make sure your transactions are accurately mapped to apps so that you can analyze your spend. For more information, see Review spend transactions.
Was this article helpful?
Glad to hear it! If you have anything you'd like to add, feel free to contact us.
Sorry to hear that. Please contact us if you'd like to provide more details.