Note
With Device Trust and Okta, you can make sure every device is known, secure, and compliant before it can access company applications protected by Okta. And you can empower your organization to remediate their own device health issues with step-by-step self remediation instructions.
These steps were recorded in March 2025 and may have changed since. Refer to the Okta documentation for the most up-to-date steps.
Note
If you use factor sequencing in Okta, learn how to migrate to authentication method chains.
Before you begin
Before you can set up Device Trust and Okta, you’ll need the following:
- 1Password Device Trust
- An Okta instance with the following products added:
- Basic or Adaptive Single Sign-on
- Basic or Adaptive Multi-factor Authentication
- Universal Directory
- Lifecycle Management
- Okta Identity Engine
- To see if you have Okta Identity Engine, sign in to your Okta admin portal and look for the letter “E” at the end of the version number in the footer. If you don’t see the letter “E”, learn how to upgrade.
Step 1: Activate your Device Trust account
If you haven’t already, you’ll need to sign in to 1Password.com and create your Device Trust tenant.
- Sign in to your account on 1Password.com.
- Select 1Password Admin Console in the top-left corner.
- Choose Kolide. This creates your Device Trust tenant.
Step 2: create a Device Trust-enabled group in Okta
First, create a Device Trust-enabled group with test users, so you can test the implementation and make sure it works the way you want it to. You can use this test group to give specific people access to Device Trust as administrators or end users during your testing.
To get started, open two browser windows side-by-side. In one window, sign in to Device Trust. In the other window, sign in to your Okta portal with an account that has super administrator privileges: https://${yourOktaDomain}-admin.okta.com.
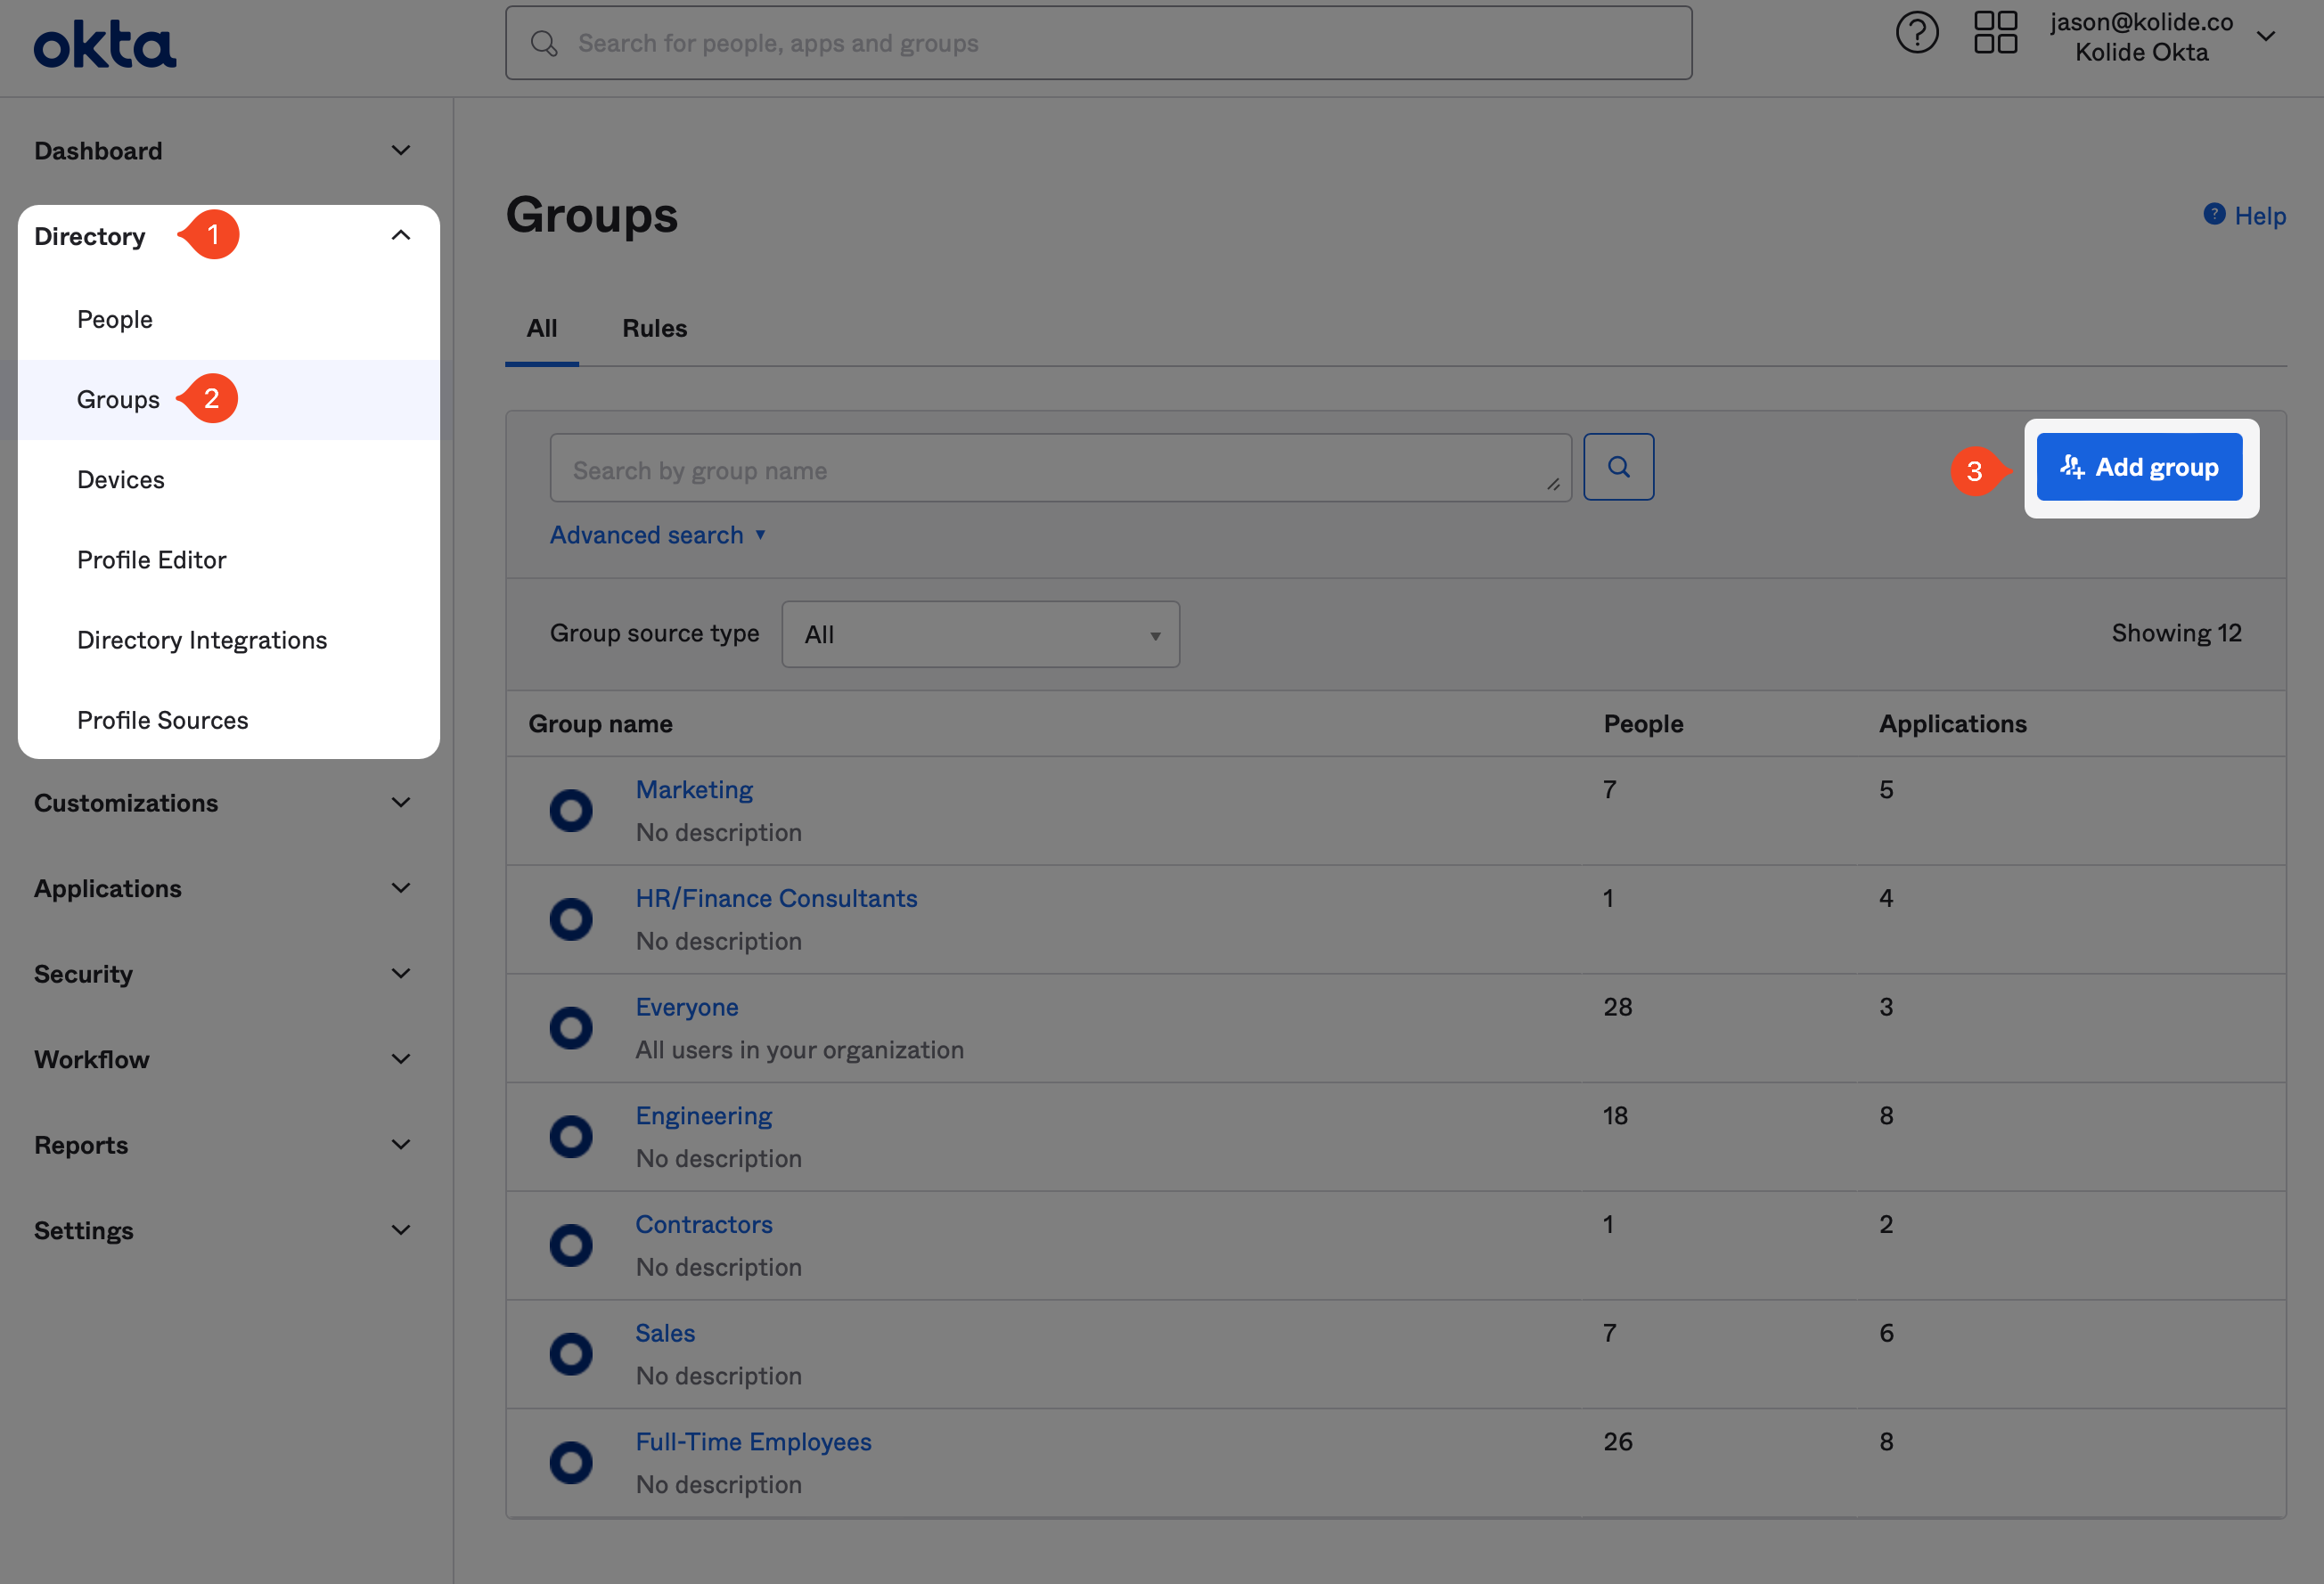
In the sidebar of your Okta administrative portal, select Directory, then choose Groups.
Select Add group in the top right corner.
Enter
Device Trust Enabledas the name, then select Save.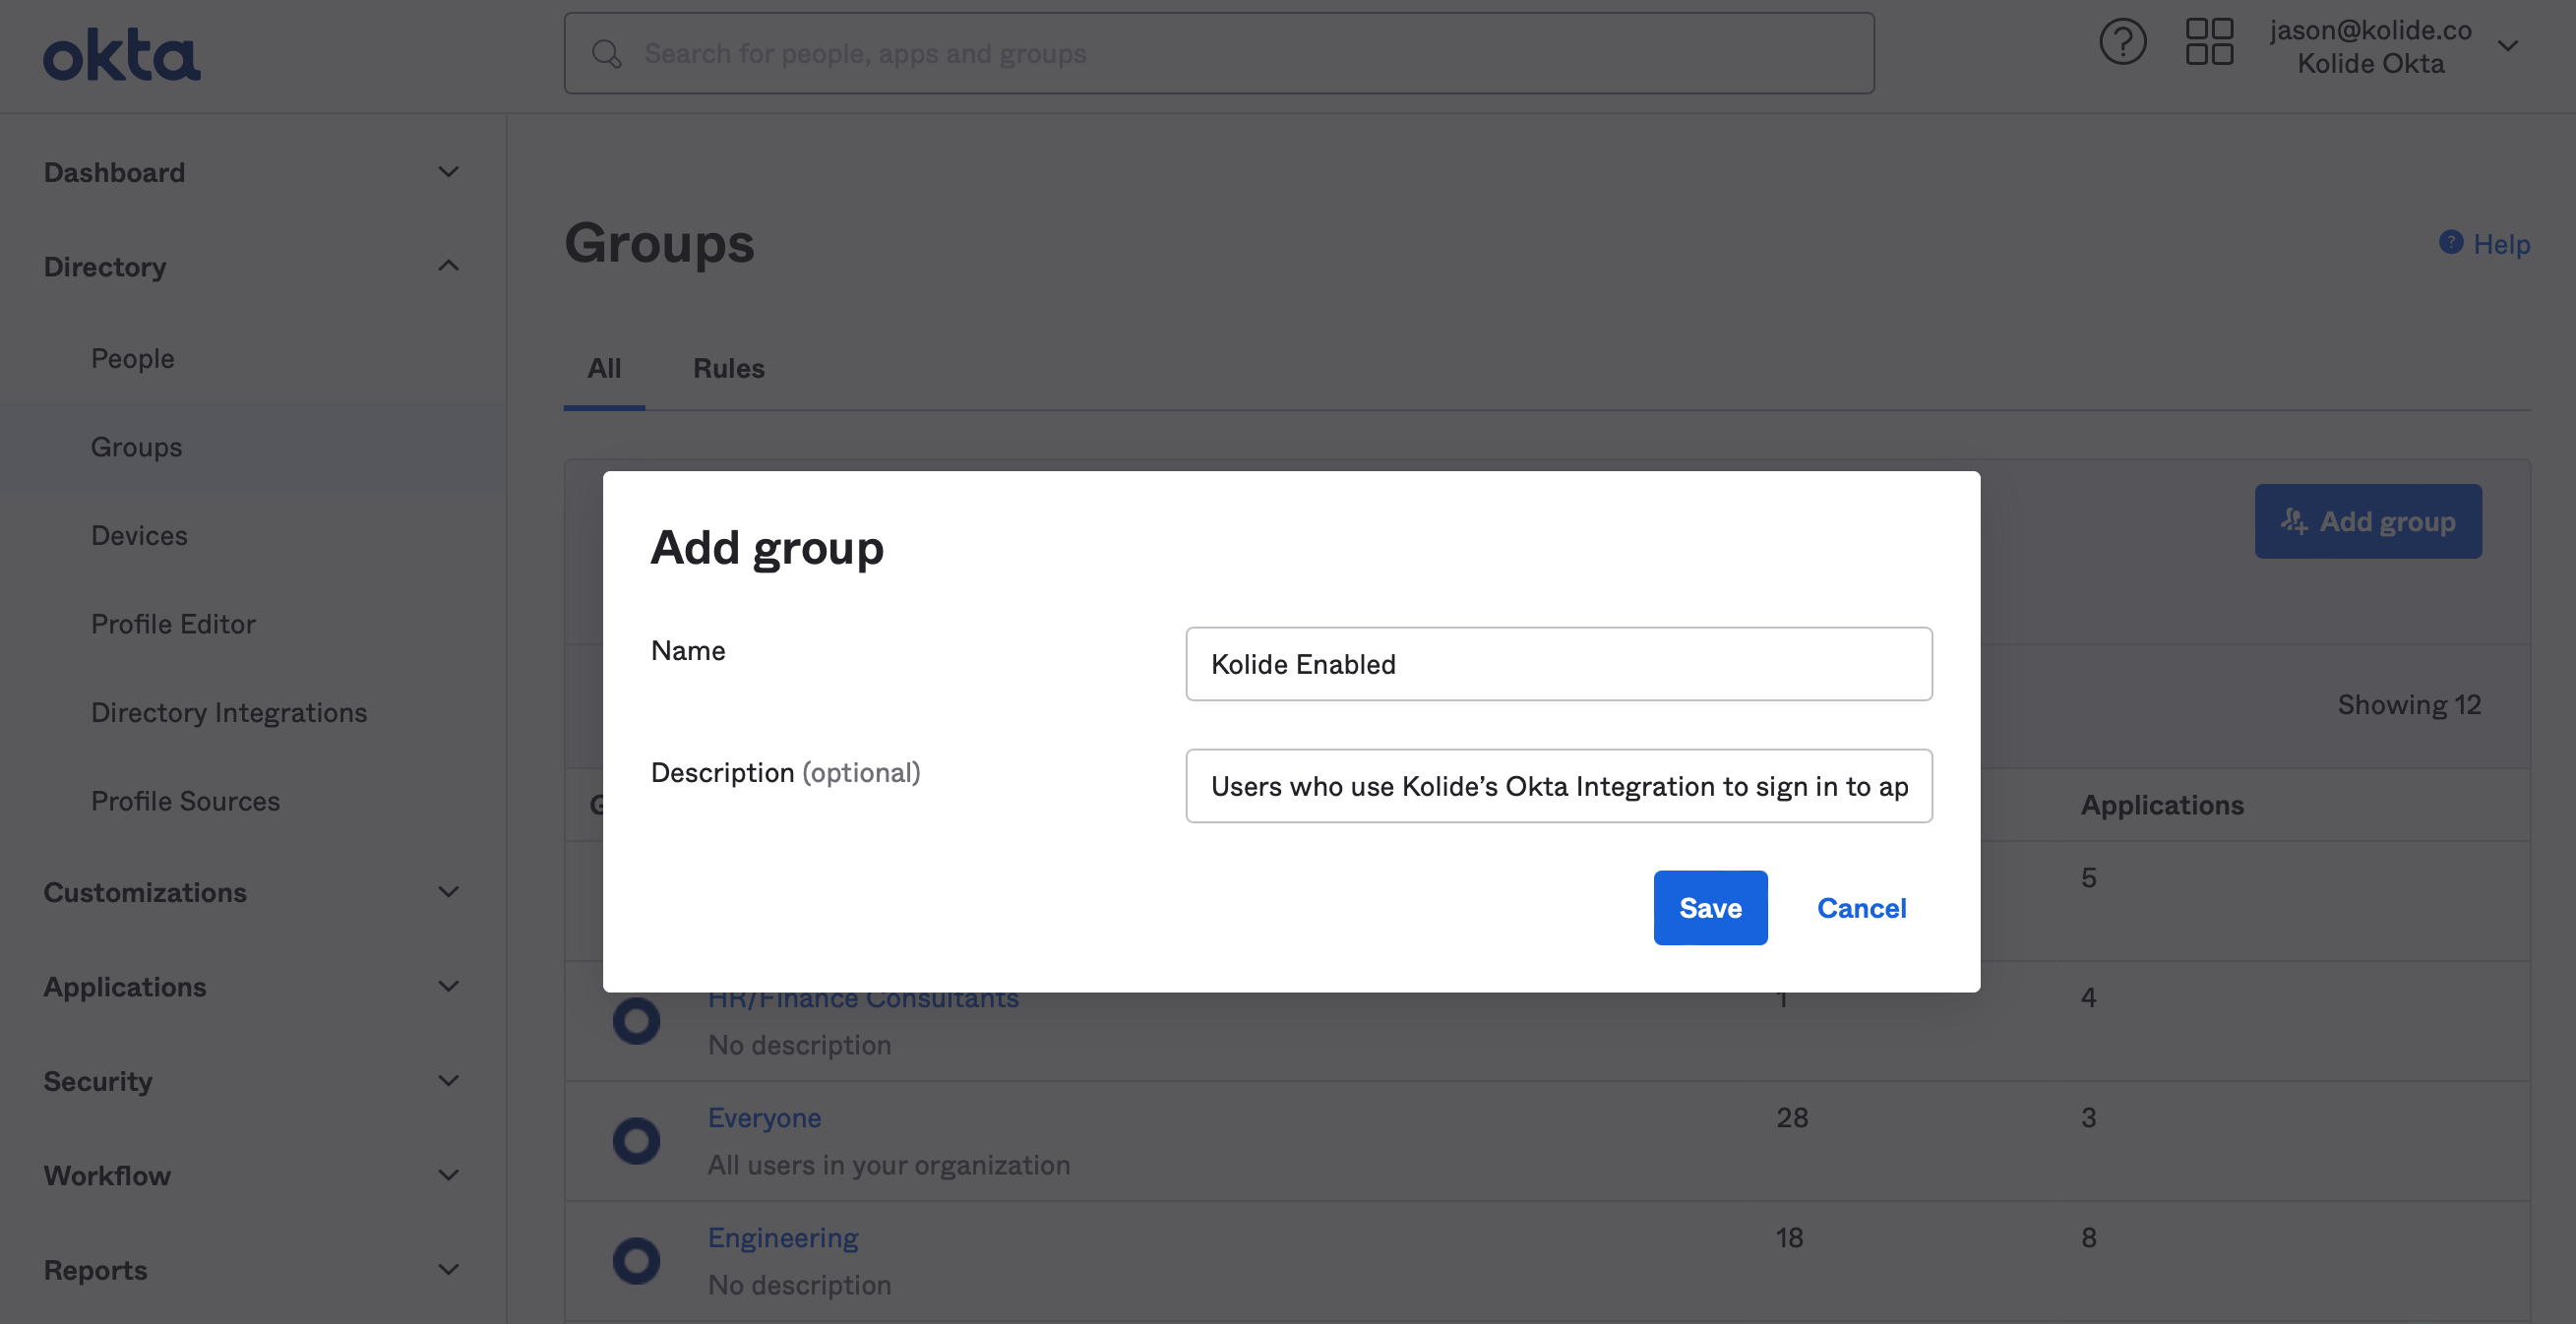
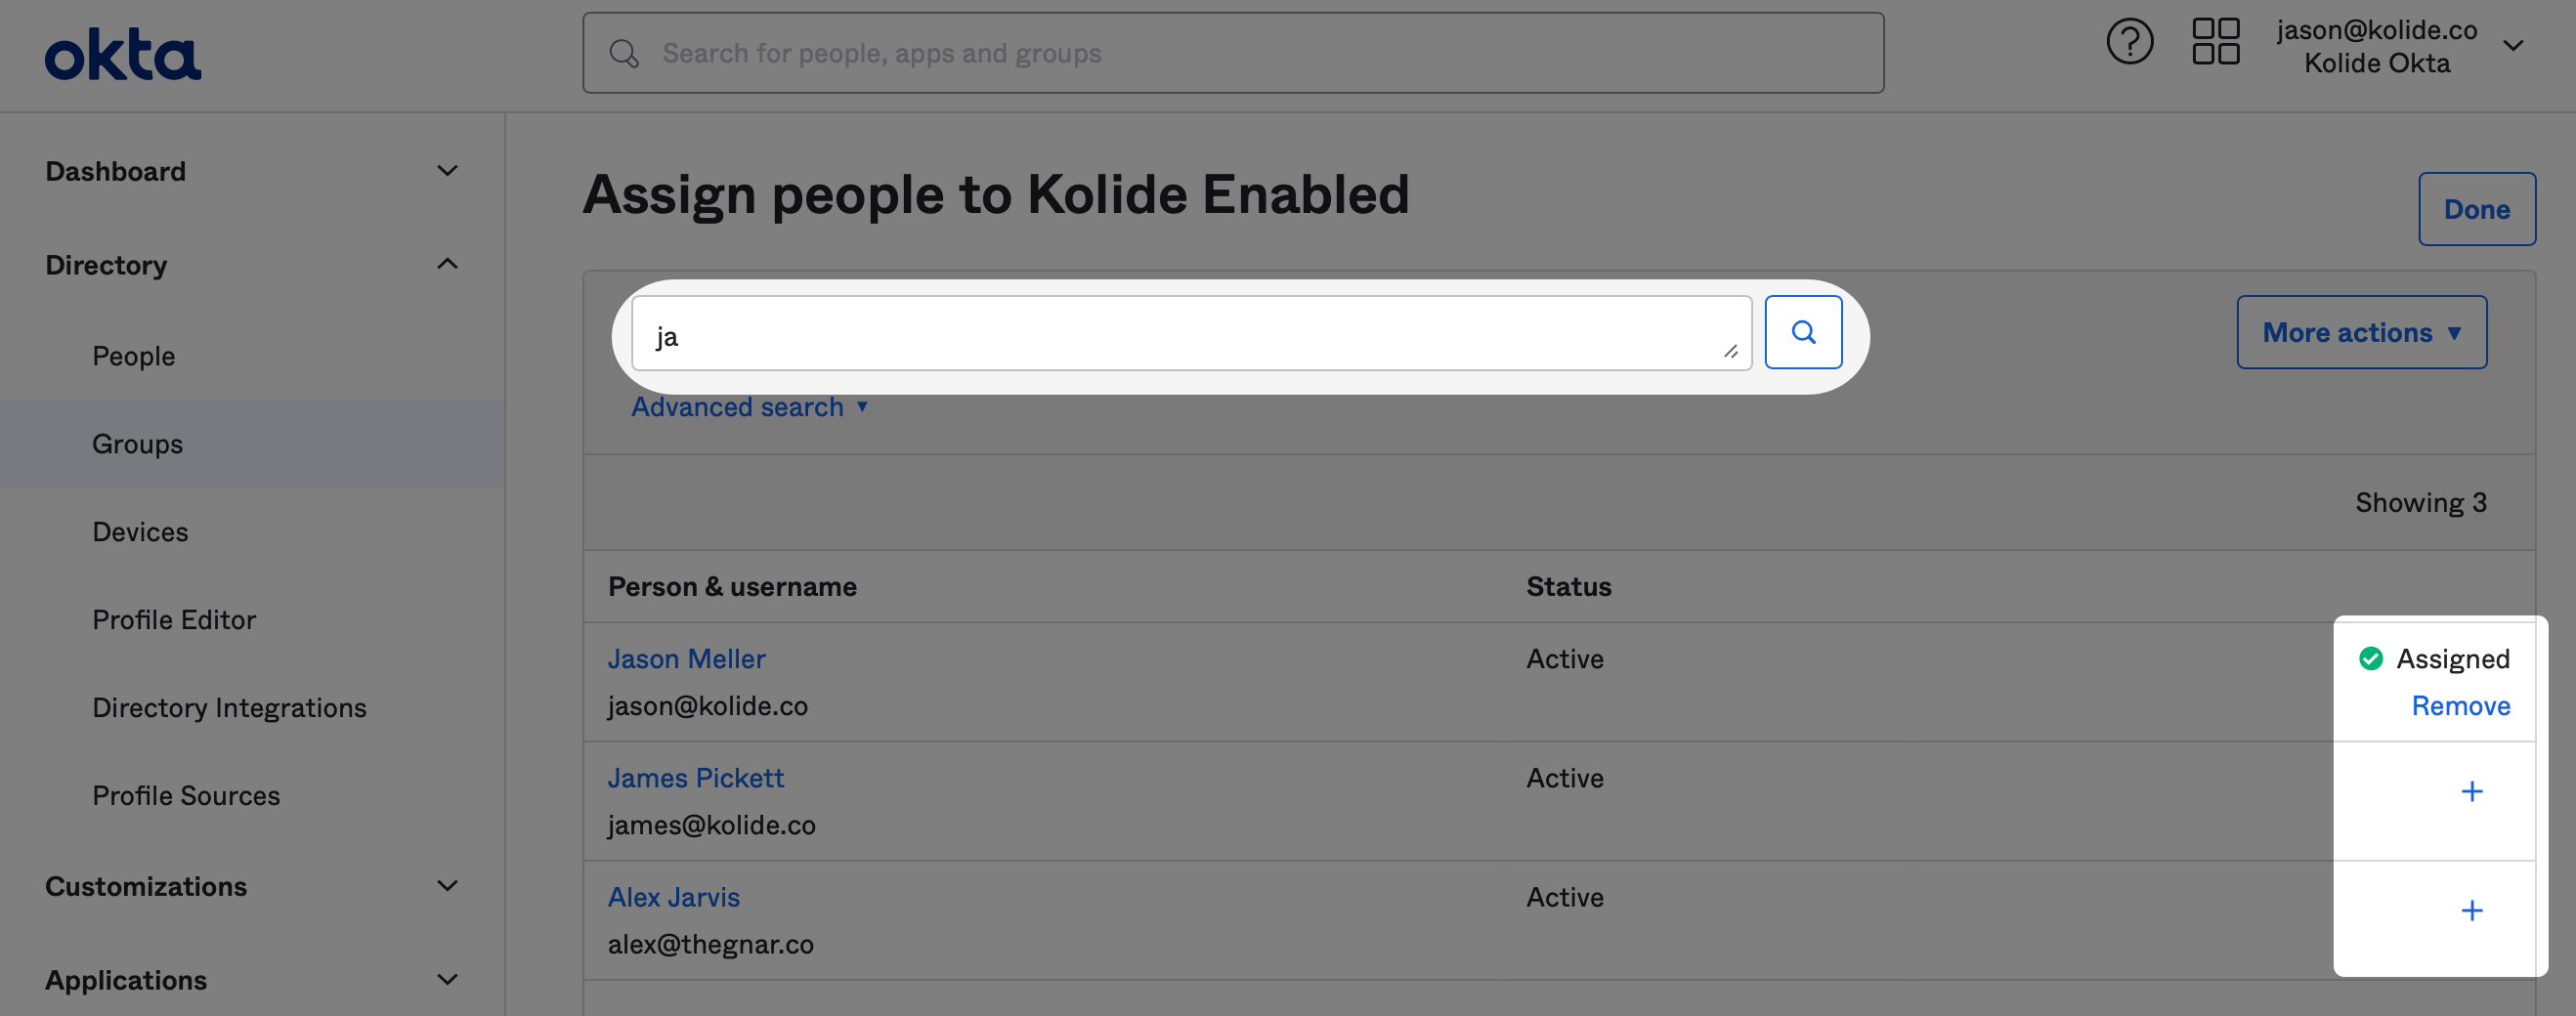
Select the Device Trust Enabled group, then choose Assign people.
To add people to test Device Trust, search for their name in the search field and select the plus icon at the end of their respective row. After you’ve added everyone you want, select Done.
Step 3: set up SAML SSO for Device Trust
Step 3.1: configure basic settings for SAML SSO
To add Device Trust as an Application to your Okta instance and configure single sign-on with SAML:
- In the sidebar of your Okta administrative portal, select Applications and Resources, then choose Applications.
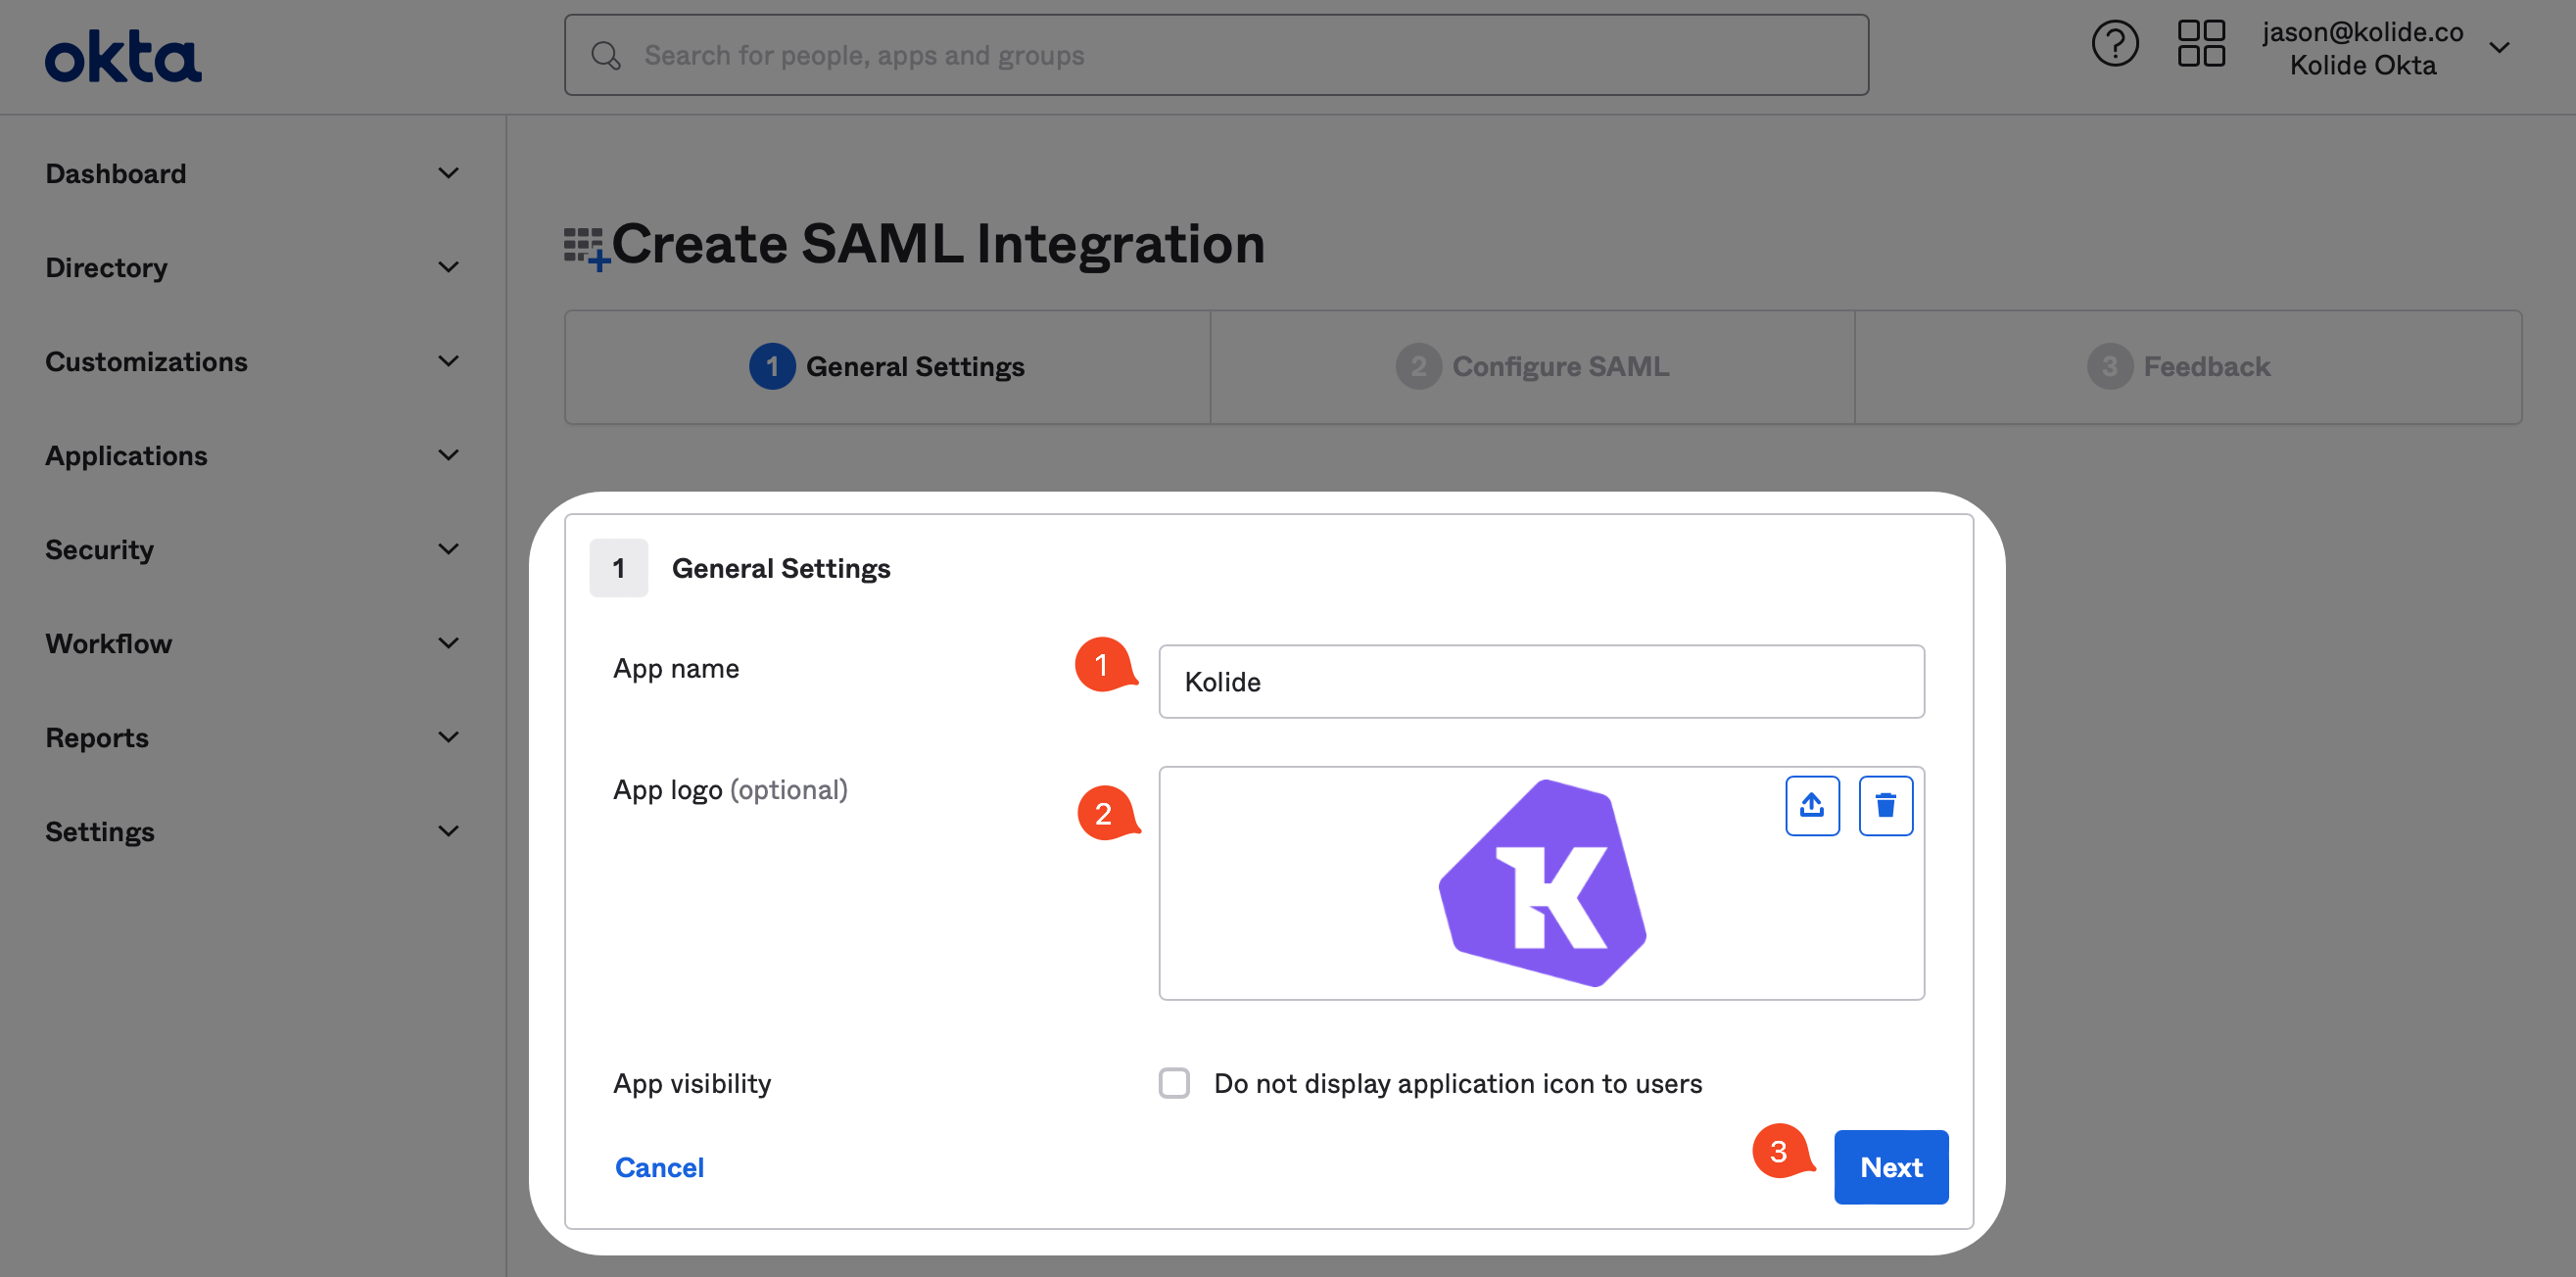
- Select Create App Integration and choose SAML 2.0, then select Next.
- Enter
Device Trust SSOas the name, then download this image and upload it as the logo. - Leave Do not display application icon to users turned off, then select Next.
Step 3.2: Copy SSO values from Device Trust to Okta
- In the Device Trust admin console, select your profile in the top-right corner and choose Settings.
- Select Identity Providers.
- Select Add Provider, then choose Okta.
- Select Set Up Single Sign-On Provider.
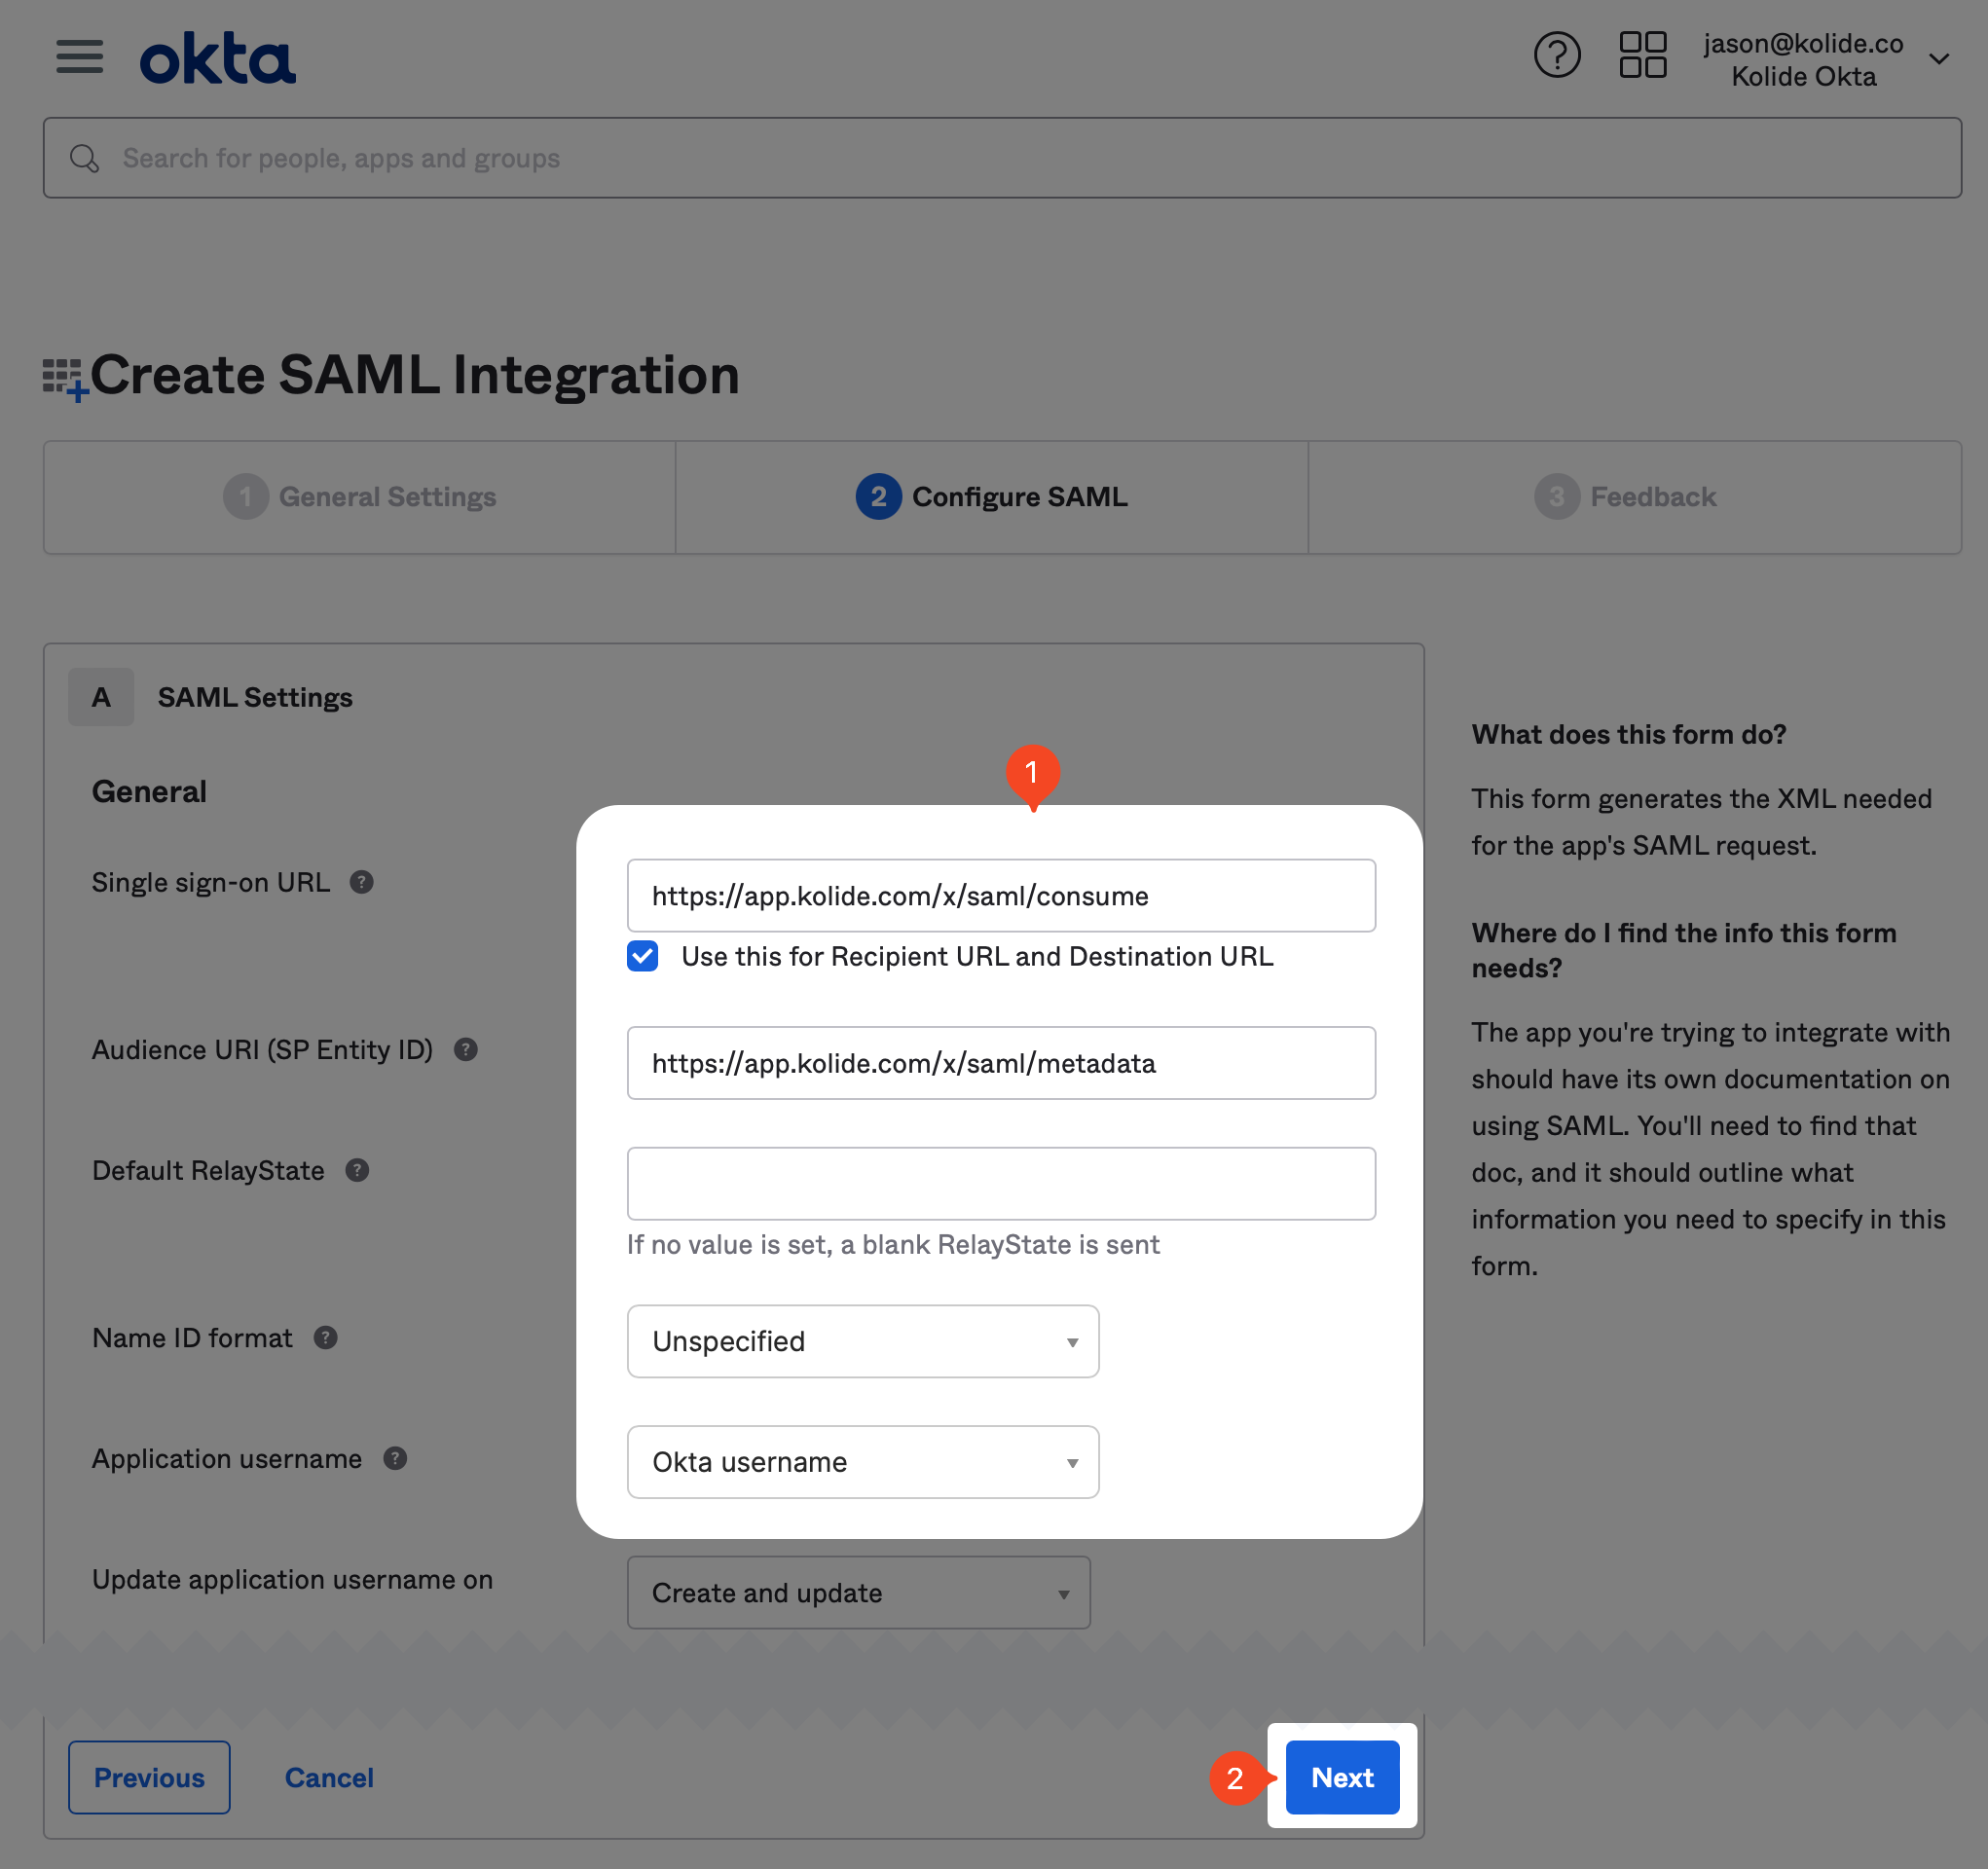
- Copy the Kolide ACS URL value into the Single sign-on URL field in Okta.
- Copy the Kolide Entity ID value into the Audience URI (SP Entity ID) field in Okta.
- Set the remaining settings to the following:
- Name ID format: Choose Unspecified.
- Application username: Choose Okta username.
- Update application username on: Choose Create and update.
- Scroll down and select Next, then select Finish.
3.3: copy SSO values from Okta to Device Trust
- In your Okta administrative portal, select View SAML setup instructions.
- Copy the Identity Provider Single Sign-On URL value in Okta into the Provider SSO URL field in Device Trust.
- Copy the X.509 Certificate value in Okta into the X.509 Certificate field in Device Trust.
- Select Save Settings, then close the “How to Configure SAML 2.0 for Device Trust Application” tab in your Okta browser window.
Step 4: set up SCIM provisioning for Device Trust
Set up SCIM, which allows Device Trust to automatically import the Okta Users. This is necessary to allow Device Trust to verify the identity of any users that sign in to apps protected by its Okta integration.
Step 4.1: configure SCIM settings in Okta
- In your Okta administrative portal, select the General tab for the Device Trust SSO application.
- Select Edit in the App Settings section, then choose SCIM in the Provisioning section and select Save.
- Select the Provisioning tab, then select Edit.
- In Device Trust, select the Identity Provider tab, then select Set Up User Provisioning.
- In Okta, configure the available settings to the following:
- SCIM connector base URL: Enter
https://app.kolide.com/scim/v2. - Unique identifier field for users: Enter
userName. - Supported provisioning actions: Turn on Push New Users, Push Profile Updates, and Push Groups.
- Authentication Mode: Choose HTTP Header.
- SCIM connector base URL: Enter
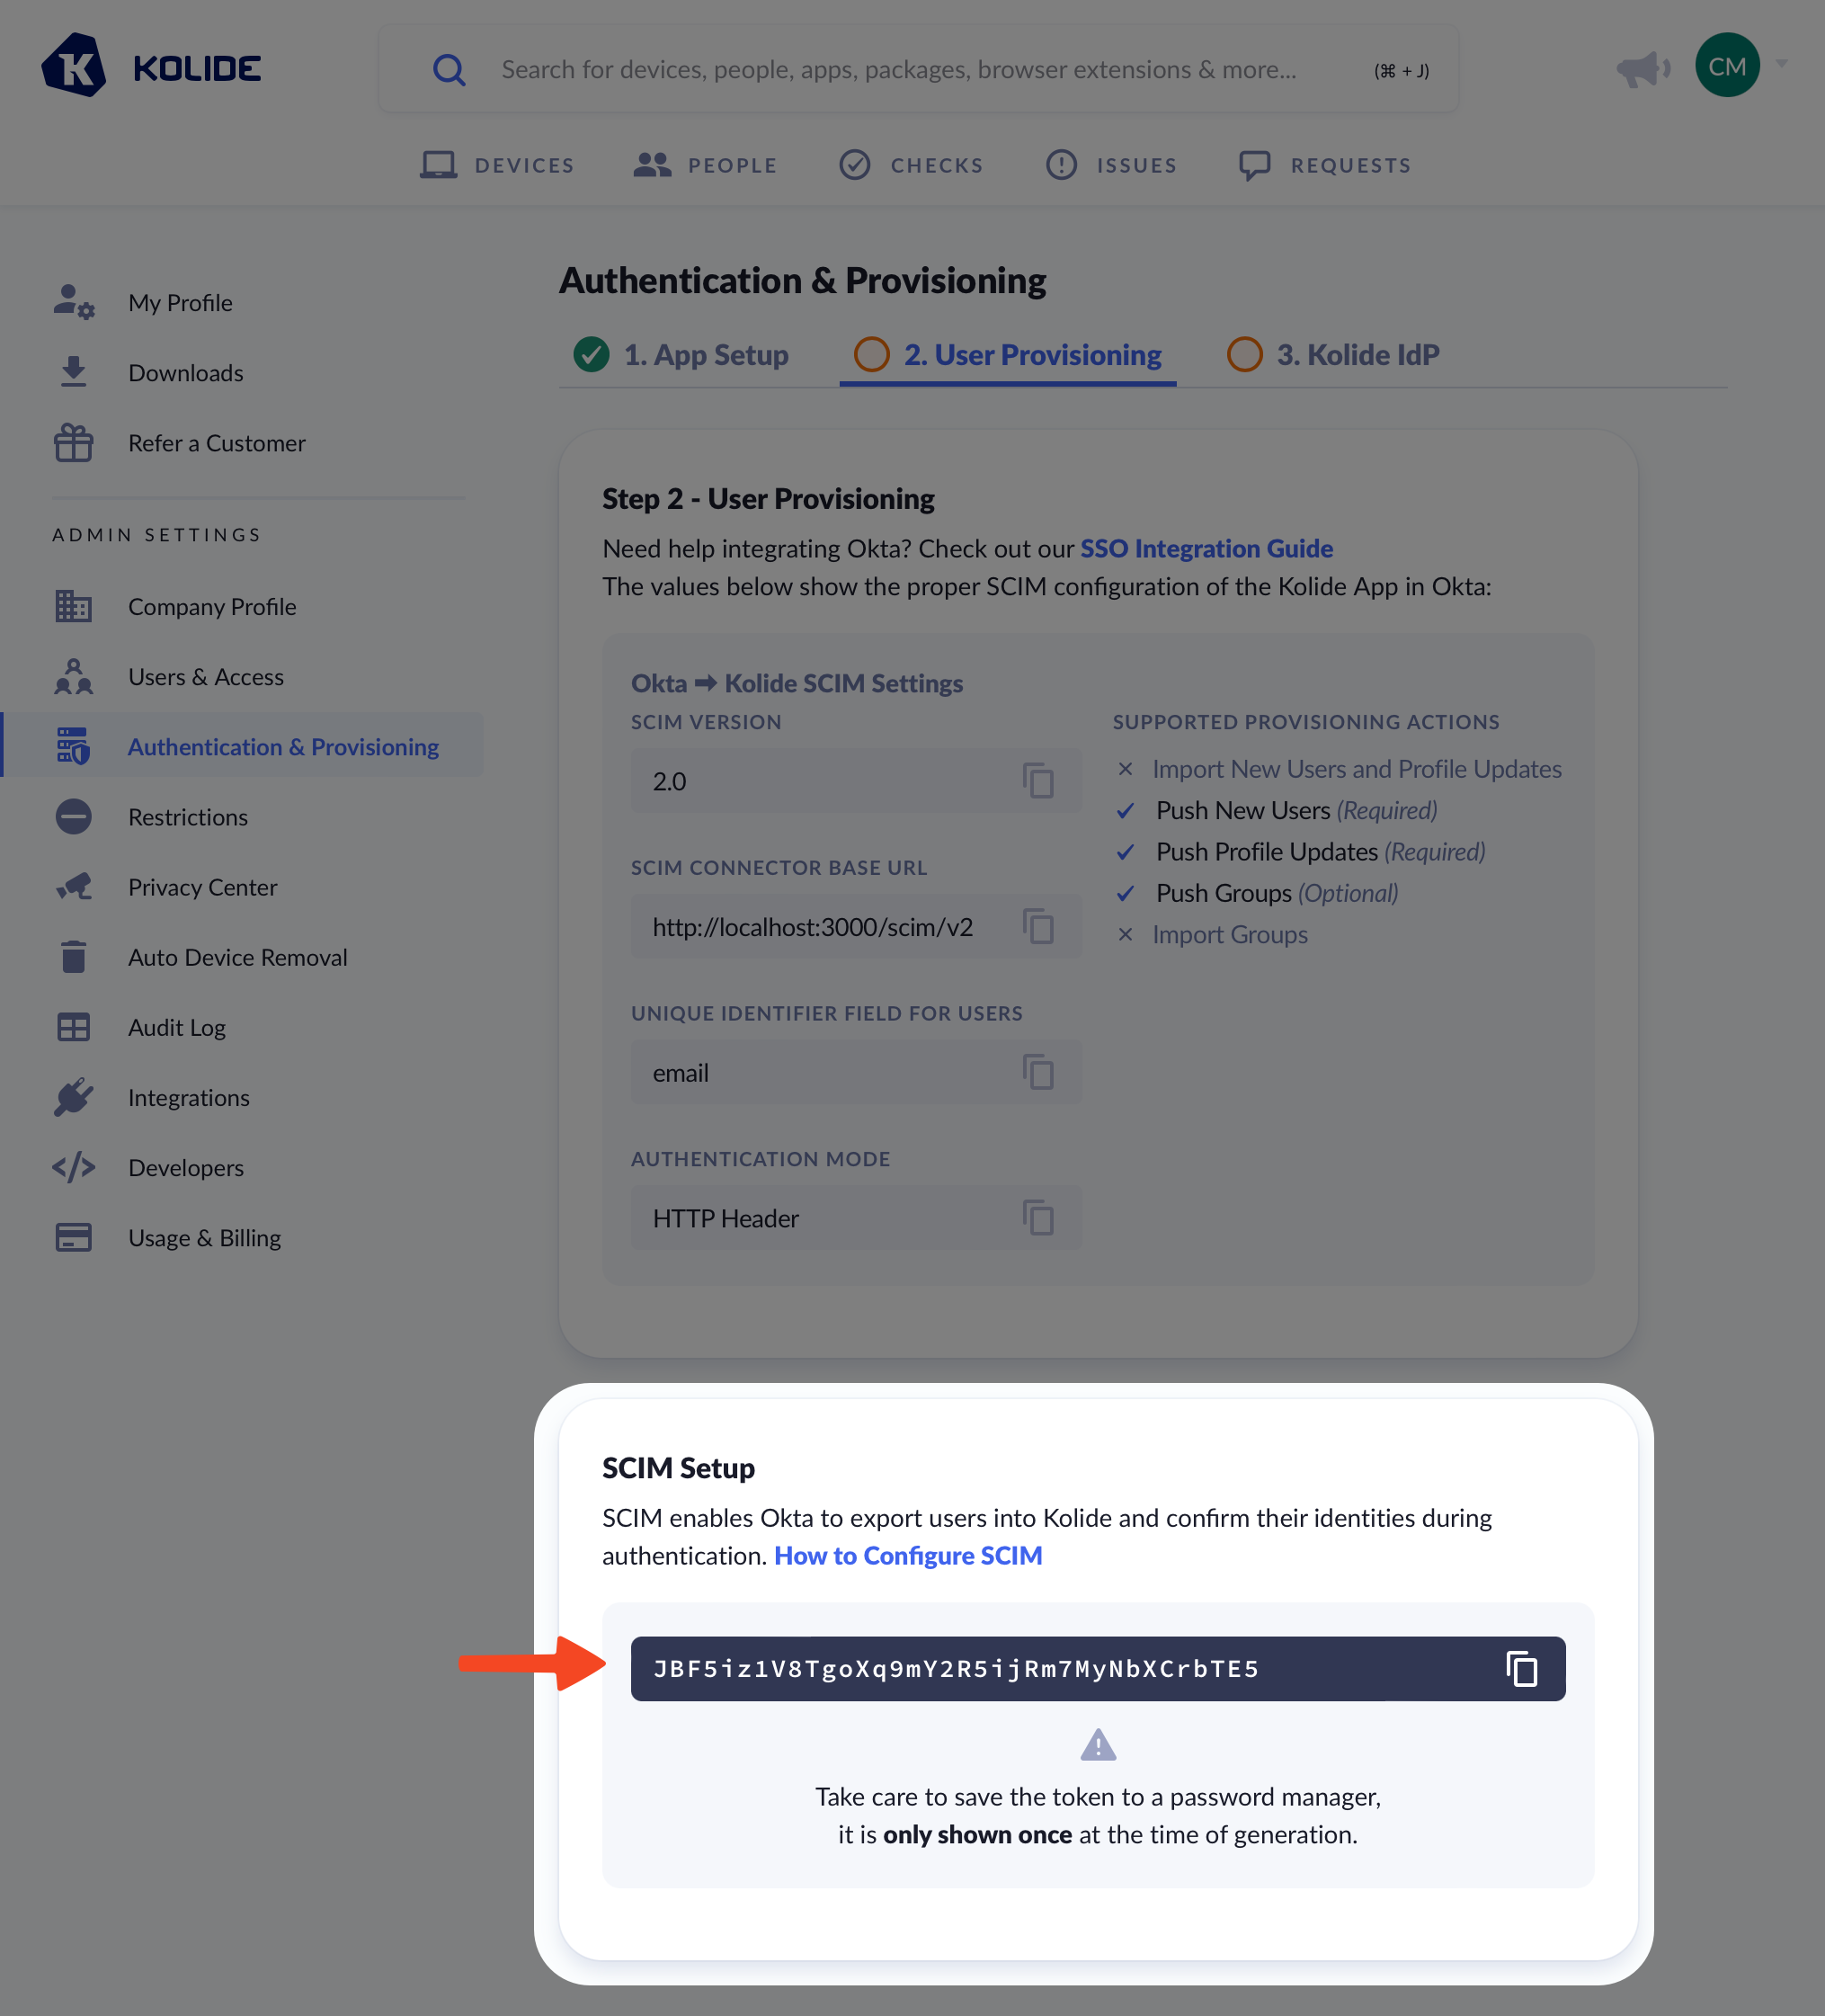
- Select Generate Authorization Bearer Token in Device Trust, then copy the bearer token value into the Token field in Okta. Consider saving the bearer token in 1Password in case you need to access it again in the future.
- In Okta, select Edit in the Provisioning to App section.
- Turn on Create Users, Update User Attributes, and Deactivate Users, then select Save.
- Scroll down to Device Trust Attribute Mappings and remove all other entries except for these required mappings:
userName,active,givenName,familyName,email, anddisplayName. - In Device Trust, select I’ve Saved The Token, Finish Set Up.
Step 4.2: provision the Device Trust-enabled group
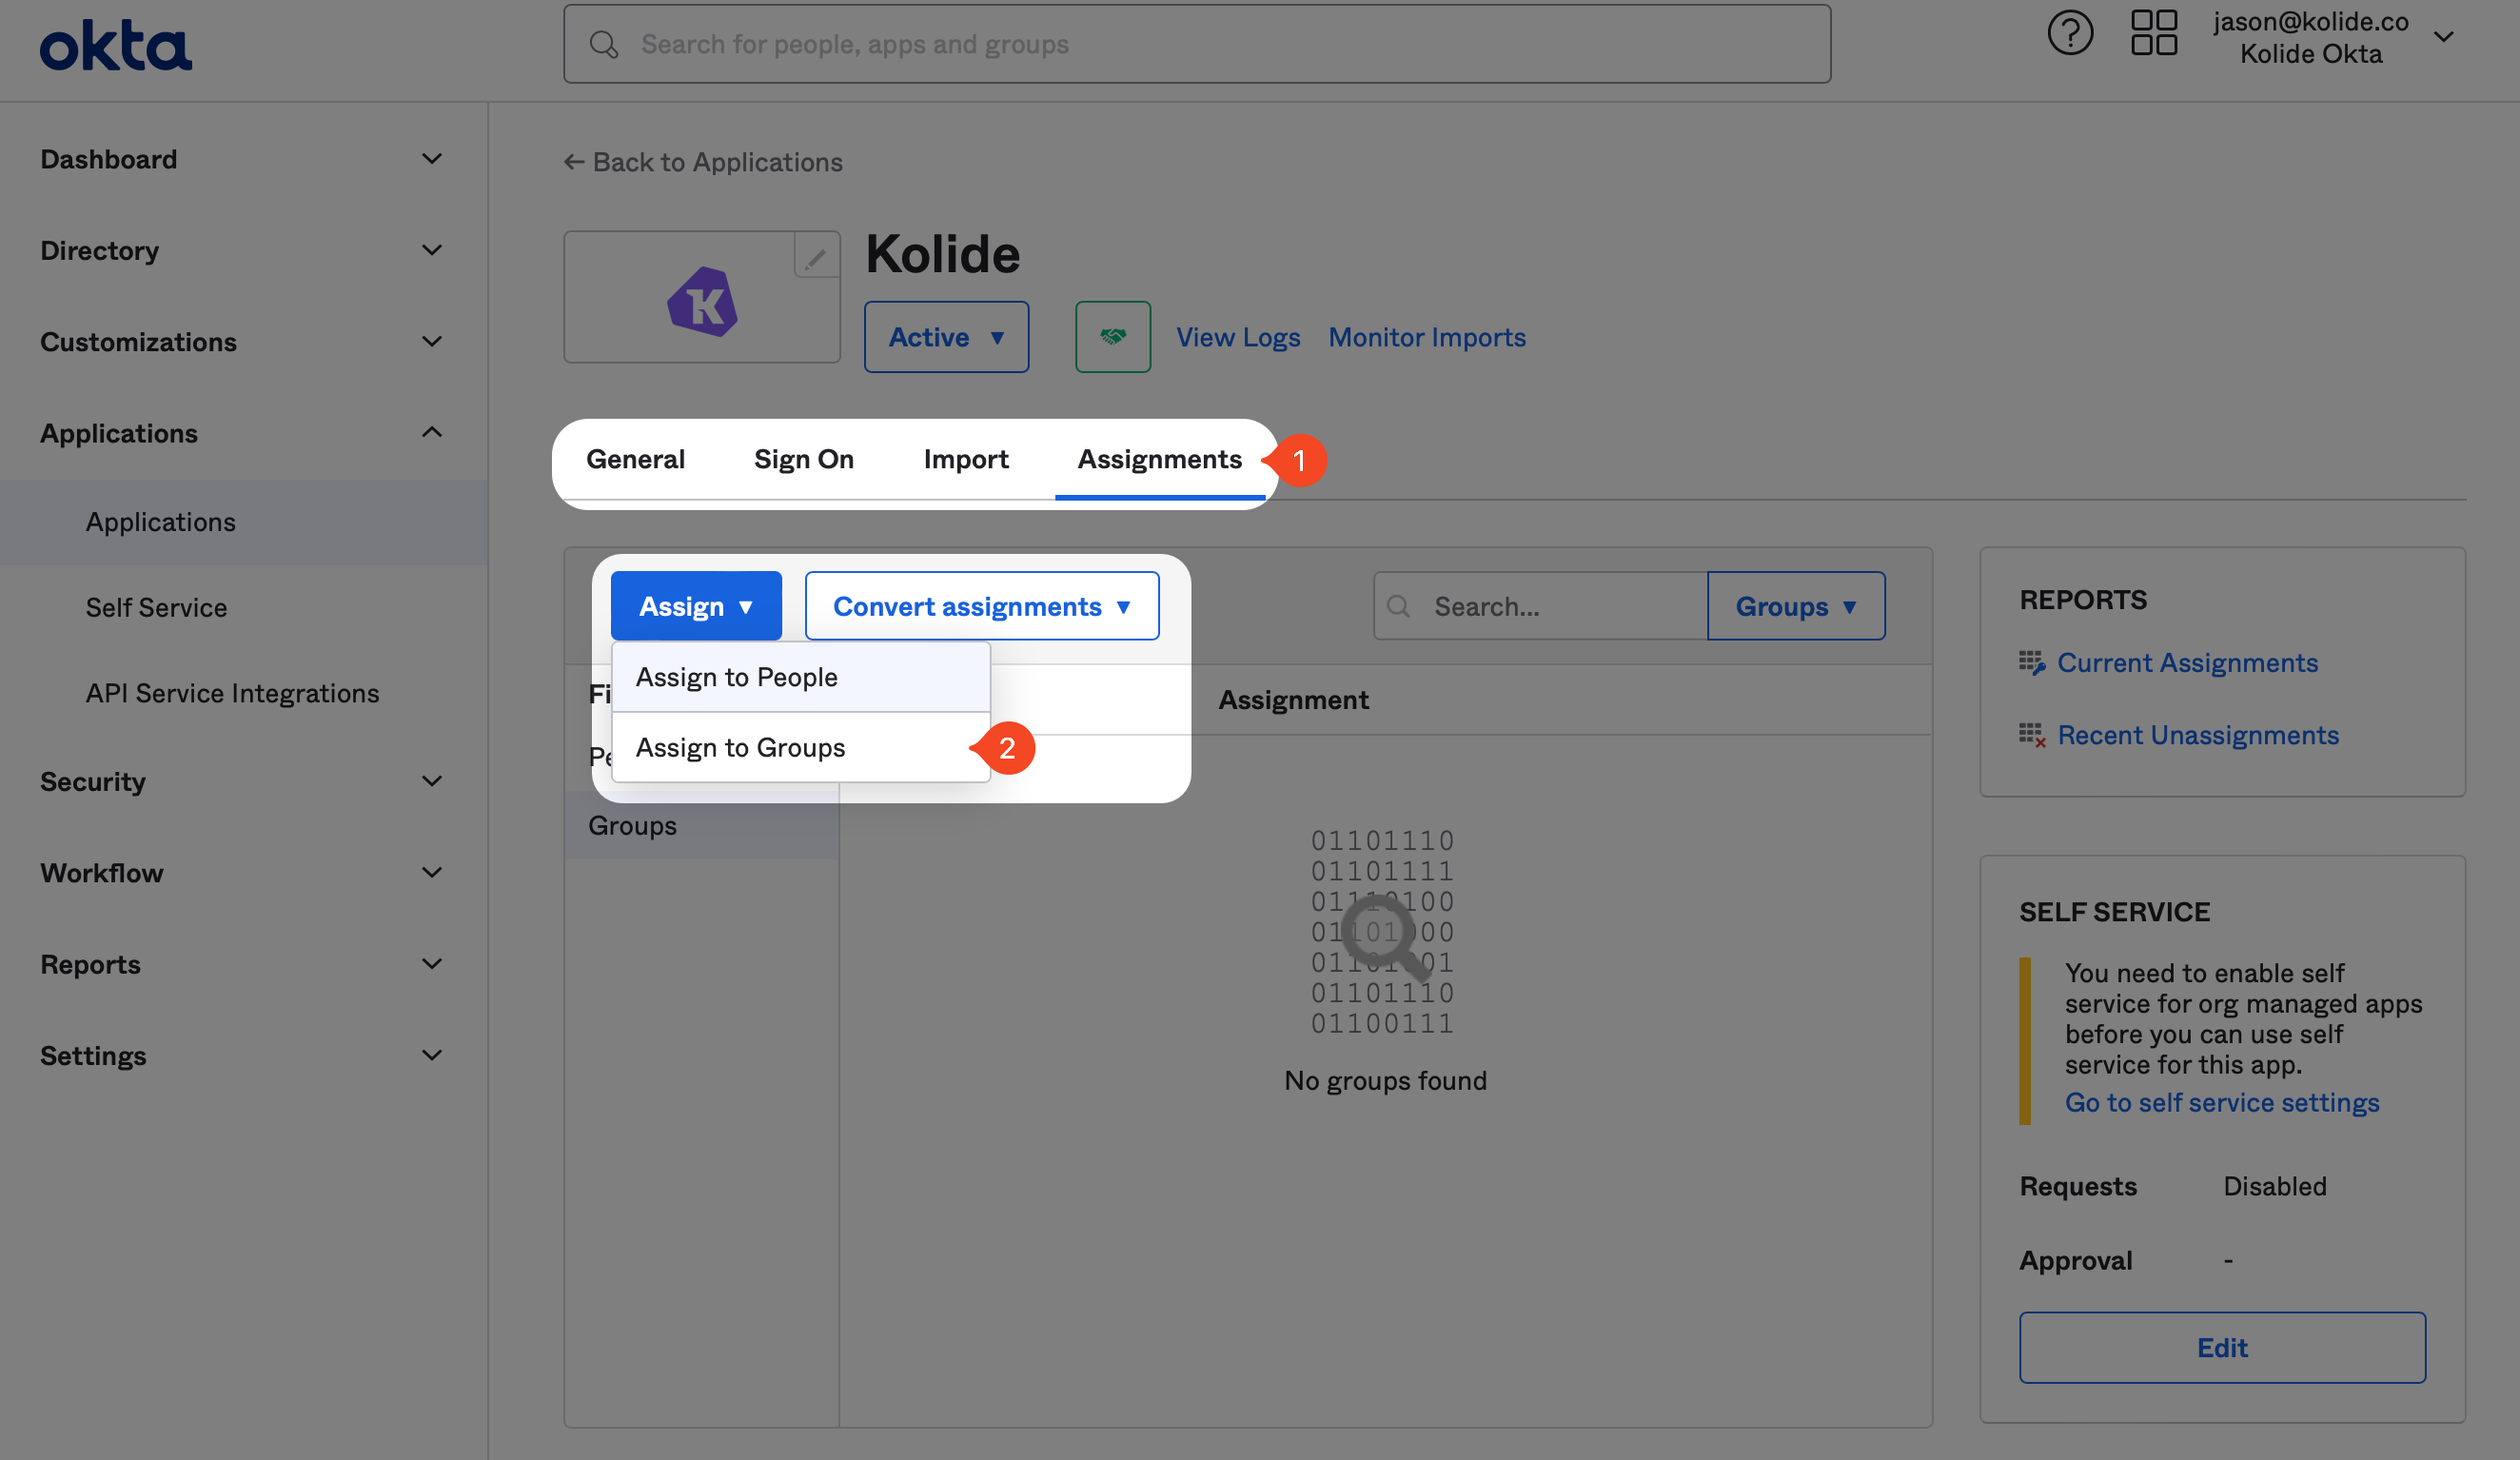
- In Okta, select the Assignments tab, then select Assign > Assign to Groups.
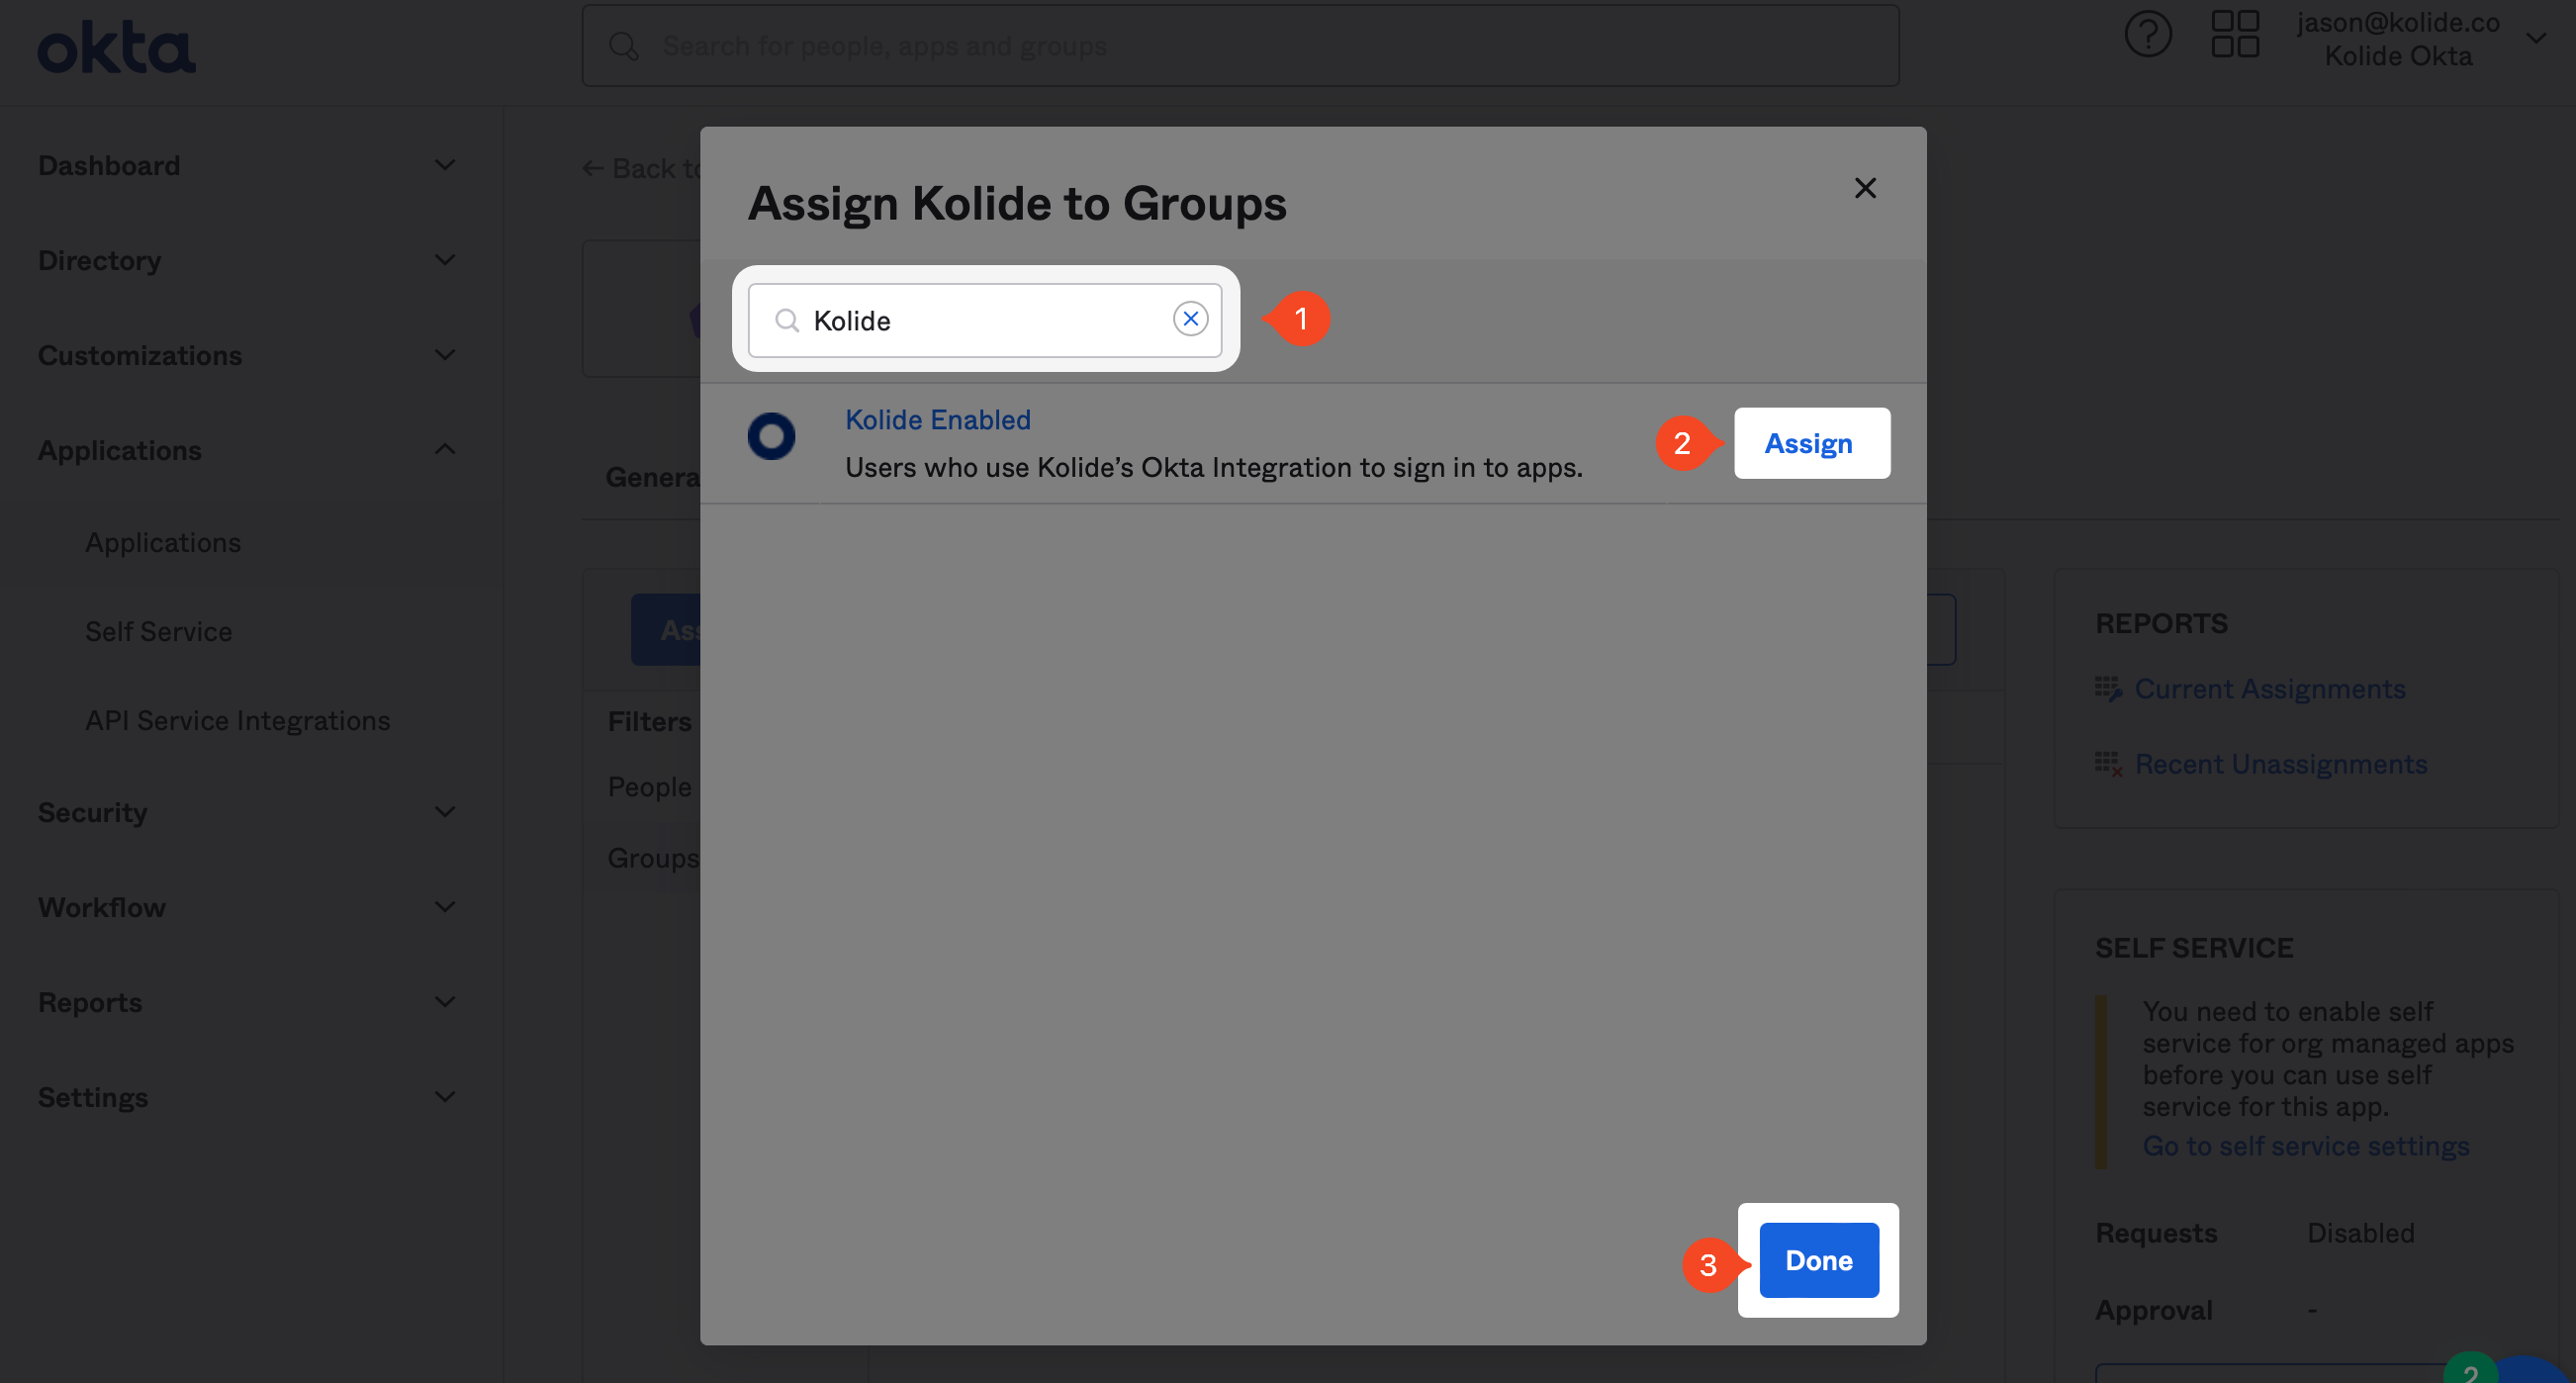
- Select Assign beside the Device Trust Enabled group, then select Save and Go Back > Done.
- In Device Trust, select Enable in the SCIM Setup section.
Step 5: Add Device Trust as an IdP authenticator in Okta
Finish setting up the Device Trust integration by adding Device Trust as an authenticator you can use as part of Okta’s Authentication Policies.
Step 5.1: Create the Device Trust IdP in Okta
- In the sidebar of your Okta administrative portal, select Security, then choose Identity Providers.
- Select Add identity provider, then choose SAML 2.0 IdP and select Next.
- Configure the available settings to the following:
- Name: Enter
Device Trust. - IdP Usage: Choose Factor only.
- IdP Issuer URI, IdP Single Sign-On URL, and Destination: Enter
https://auth.kolide.com/saml - IdP Signature Certificate: Download this certificate, then select Browse files in Okta and choose the certificate file.
- Name: Enter
- Select Finish.
Step 5.2: Configure the IdP settings in Device Trust
- In Device Trust, select the Identity Providers tab, then choose Set Up Authenticator.
- Copy the IdP ID value in Okta into the IdP ID field in Device Trust.
- Copy the Assertion Consumer Service URL value in Okta into the Assertion Consumer Service URL field in Device Trust.
- Copy the Audience URI value in Okta into the Audience URI field in Device Trust.
- In the sidebar of your Okta administrative portal, select Identity Providers.
- Select Actions for the Device Trust identity provider and choose Download Certificate.
- In Device Trust, drag the certificate file into the Certificate field, then select Save Configuration.
- Select the vertical ellipsis icon in Device Trust, then choose Make Primary.
Note
If you use a custom domain with Okta, make sure to use the Okta domain in the Assertion Consumer Service URL field instead of your custom domain.
Example: https://yourdomain.okta.com, not https://login.yourdomain.com
Step 5.3: Add the Device Trust IdP authenticator to Okta
- In the sidebar of your Okta administrative portal, select Authenticators.
- Select Add authenticator, then select Add in the IdP Authenticator section. If you add an IdP Authenticator, you’ll need to remove any previously configured IdP authenticator to continue.
- Choose Device Trust in the Identity Provider dropdown menu, then select Add.
- Select the Enrollment tab, then select Actions > Edit for the default policy.
- Set Device Trust (IdP) to Disabled.
Step 5.4: Create an authenticator enrollment policy for Device Trust
- In the sidebar of your Okta administrative portal, select Authenticators.
- Select Add a policy. Then enter
Device Trust Enrollment Policyin the “Policy name” field. - Assign the Device Trust Enabled group to the policy.
- Select Optional in the dropdown for the Device Trust Authenticator.
- Disable any authenticators that your organization doesn’t use, then select Create policy.
- Enter
Defaultin the “Rule name” field, then select Create rule. - Make sure the Default rule is at the top of the rules list.
- Move the Device Trust Enrollment Policy to the top of the policies list.
Step 6: Add Device Trust to an authentication policy
Configure an authentication policy rule
- In the sidebar of your Okta administrative portal, select Authentication Policies.
- Select the authentication policy you want to add Device Trust to.
- Select Add rule and enter
Device Trust Protectedin the “Rule name” field. - Choose At least one of the following groups in the “User’s group membership includes” dropdown menu.
- Add the Device Trust Enabled group as an included group.
Choose your authenticator requirements
At this step, you must decide what type of Authentication Policy you prefer to use:
- Authentication Method Chain (Recommended)
- Allows for passwordless experiences (Okta FastPass, WebAuthn, and so on), and three-factor authentication requirements.
- Password + Device Trust Authentication Policy
- Requires Device Trust as the only Possession-based Factor.
Option 1 - Authentication Method Chain (Recommended)
To allow your organization to authenticate with Device Trust along with other authentication methods, you can set up an authentication method chain in Okta. For example, you can choose to create:
- A three-factor authentication flow with your choice of authenticators, such as a password, Okta Verify, and Device Trust.
- A passwordless authentication flow with Okta FastPass and Device Trust.
- To allow the option for password-based authentication, you could also create a secondary chain within this flow with passwords and Device Trust as the selected factors.
Learn more about how to set up an authentication method chain.
Note
Option 2 - Password + Device Trust
- Scroll down, then choose Allow specific authentication methods in the “Authentication methods” section.
- Choose Device Trust as the authentication method to allow.
Finish setting up authentication policy rule
- Scroll down to the “When to prompt for authentication” section, then configure these settings to the following:
- Prompt for password authentication: Choose When it’s been over a specified length of time, then set the “Time since last sign in” options to values that match your organization’s policies.
- Prompt for all other factors of authentication: Choose When it’s been over a specified length of time, then set the “Time since last sign in” options to values that match your organization’s policies.
- Select Save.
You may need to scroll to the bottom again and select Save anyway to continue.
- Move the Device Trust Protected rule to the top of the authentication policies list.
Step 7: Test authentication using Device Trust
To test the sign-in flow in Okta with Device Trust, you can access an app that’s protected by the authentication policy you defined in Okta in the previous step. If you already have the Kolide agent installed, Device Trust will verify your device’s health. Otherwise, Device Trust will instruct you to install the agent to continue.
If you don’t see Device Trust when you try to sign in to an app, try accessing an app through Okta using a private or incognito window in your browser.
Optional: implement a recovery plan
1Password strives to deliver world-class uptime, but every robust security strategy needs to account for contingencies. Because Okta is where you define the requirements for a user to access your protected applications, a SAML authentication outage can result in a full outage in which no authentication requests through 1Password Device Trust will succeed.
The best way to prepare for this situation is to create “break-glass” rules in your environment that you can quickly activate in case of an outage.
Get help
If your organization sees multiple authenticator options when accessing an application, but you only want Device Trust to be available, review your authentication policy rules for that application to make sure that:
- Device Trust is the only authenticator permitted after a password.
- If you’re using an authentication method chain, you’ve separated authenticators by
andinstead ofor.
To make sure that Device Trust secures applications when accessed outside of your Okta dashboard, create an authentication policy for the applications you want to always protect with Device Trust, then require Device Trust in a rule within that policy.
If you have team members who should be excluded from Device Trust, but they’re still prompted to enroll in or to use Device Trust, follow these steps:
- Make sure to scope your authenticator enrollment policy to your Device Trust Enabled group so it only applies to team members who use Device Trust.
- Review your other authentication enrollment policies to make sure Okta didn’t automatically add the Device Trust IdP to them.
- Review your authentication policies to make sure that Device Trust wasn’t added to any policies other than the one you set up.
- Review your global session policies to make sure a policy isn’t applied to your Device Trust Enabled group that requires multi-factor authentication.
- If there is, consider creating a second global session policy specifically for your Device Trust Enabled group. Make sure it doesn’t require multi-factor authentication, then review your authentication policies to make sure other authentication methods are still appropriately enforced.
Okta FastPass
While Device Trust acts a full possession-based multi-factor authenticator, you may wish to sequence Device Trust with an existing multi-factor authentication provider, like Okta Fastpass.
How to set up Okta FastPass factor sequencing
You can find the complete set up instructions in the factor sequencing section of our Connect Device Trust to Okta page.
Okta Verify
While Device Trust acts a full possession-based multi-factor authenticator, you may wish to sequence Device Trust with an existing multi-factor authentication provider, like Okta Verify.
How to set up Okta Verify factor sequencing
You can find the complete set up instructions in the factor sequencing section of our Connect Device Trust to Okta page.
Okta Verify (passwordless)
While Device Trust acts a full possession-based multi-factor authenticator, you may wish to sequence Device Trust with an existing multi-factor authentication provider, like Okta Verify while not requiring a password.
How to set up Okta Verify factor sequencing
You can find the complete set up instructions in the factor sequencing section of our Connect Device Trust to Okta page.
Video walkthrough
If you prefer a step-by-step visual tutorial of the Connect Device Trust to Okta Guide, we’ve prepared the videos below.
Step 1: Create a group for people in-scope for Device Trust
In this step, we will create an Okta Group that we will use throughout this guide to precisely define the exact Users in your Okta instance that will use Device Trust’s Okta integration to sign in to apps.
Step 2: Add the Device Trust app to Okta
In this step, we will add Device Trust as an Application to your Okta instance and configure single sign-on with SAML. (Enabling SAML affects all users who use Device Trust.)
Step 3: Set up automatic user provisioning (SCIM)
In this step, we will set up SCIM which allows Device Trust to automatically import the Okta Users. This is necessary to allow Device Trust to verify the identity of any users that sign into apps protected by its Okta integration.
Step 4: Add Device Trust as an IdP authenticator to Okta
In this step, we will finish setting up the Device Trust integration by adding Device Trust as an authenticator you can use as part of Okta’s Authentication Policies.
Part 1: add identity provider to Okta
Part 2: add authenticator to Okta
Part 3: add Device Trust to your Okta authentication policies
Step 5: Factor sequencing
Part 1: create a new app integration
Part 2: create authentication policies
Part 3: create event hook
Part 4: create global session policy
WebAuthn
While Device Trust acts a full possession-based multi-factor authenticator, you may wish to sequence Device Trust with WebAuthn.
How to set up WebAuthn factor sequencing
You can find the complete set up instructions in the factor sequencing section of our Connect Device Trust to Okta page.
YubiKeys
While Device Trust acts a full possession-based multi-factor authenticator, you may wish to sequence Device Trust with an existing multi-factor authentication provider, like Yubikeys.
How to set up YubiKey factor sequencing
You can find the complete set up instructions in the factor sequencing section of our Connect Device Trust to Okta page.
Okta integration
Important
Work In Progress
This guide is meant to be used with Device Trust’s Okta Integration Network (OIN) app which is not yet release. We are making this guide available publicly early to assist in Okta’s official review.
SAML Configuration
Setup guide for configuring single-sign-on for Device Trust with SAML 2.0.
How to configure SAML for Device Trust
Important
Work In Progress
This guide is meant to be used with Device Trust’s Okta Integration Network (OIN) app which is not yet released. We are making this guide available publicly early to assist in Okta’s official review.
In this step, we will add Kolide as an Application to your Okta instance and configure single sign-on with SAML. (Enabling SAML affects all users who use Device Trust.)
Supported features
- SP-initiated SSO (Single Sign-On)
- IdP-initiated SSO (through Third-party Initiated Login)
Configuration steps
If you haven’t already, sign into your Okta Administrative portal
https://${yourOktaDomain}-admin.okta.com. Once signed in, click
Applications in the left-hand sidebar, and then Browse App Catalog
near the top of the resulting page.
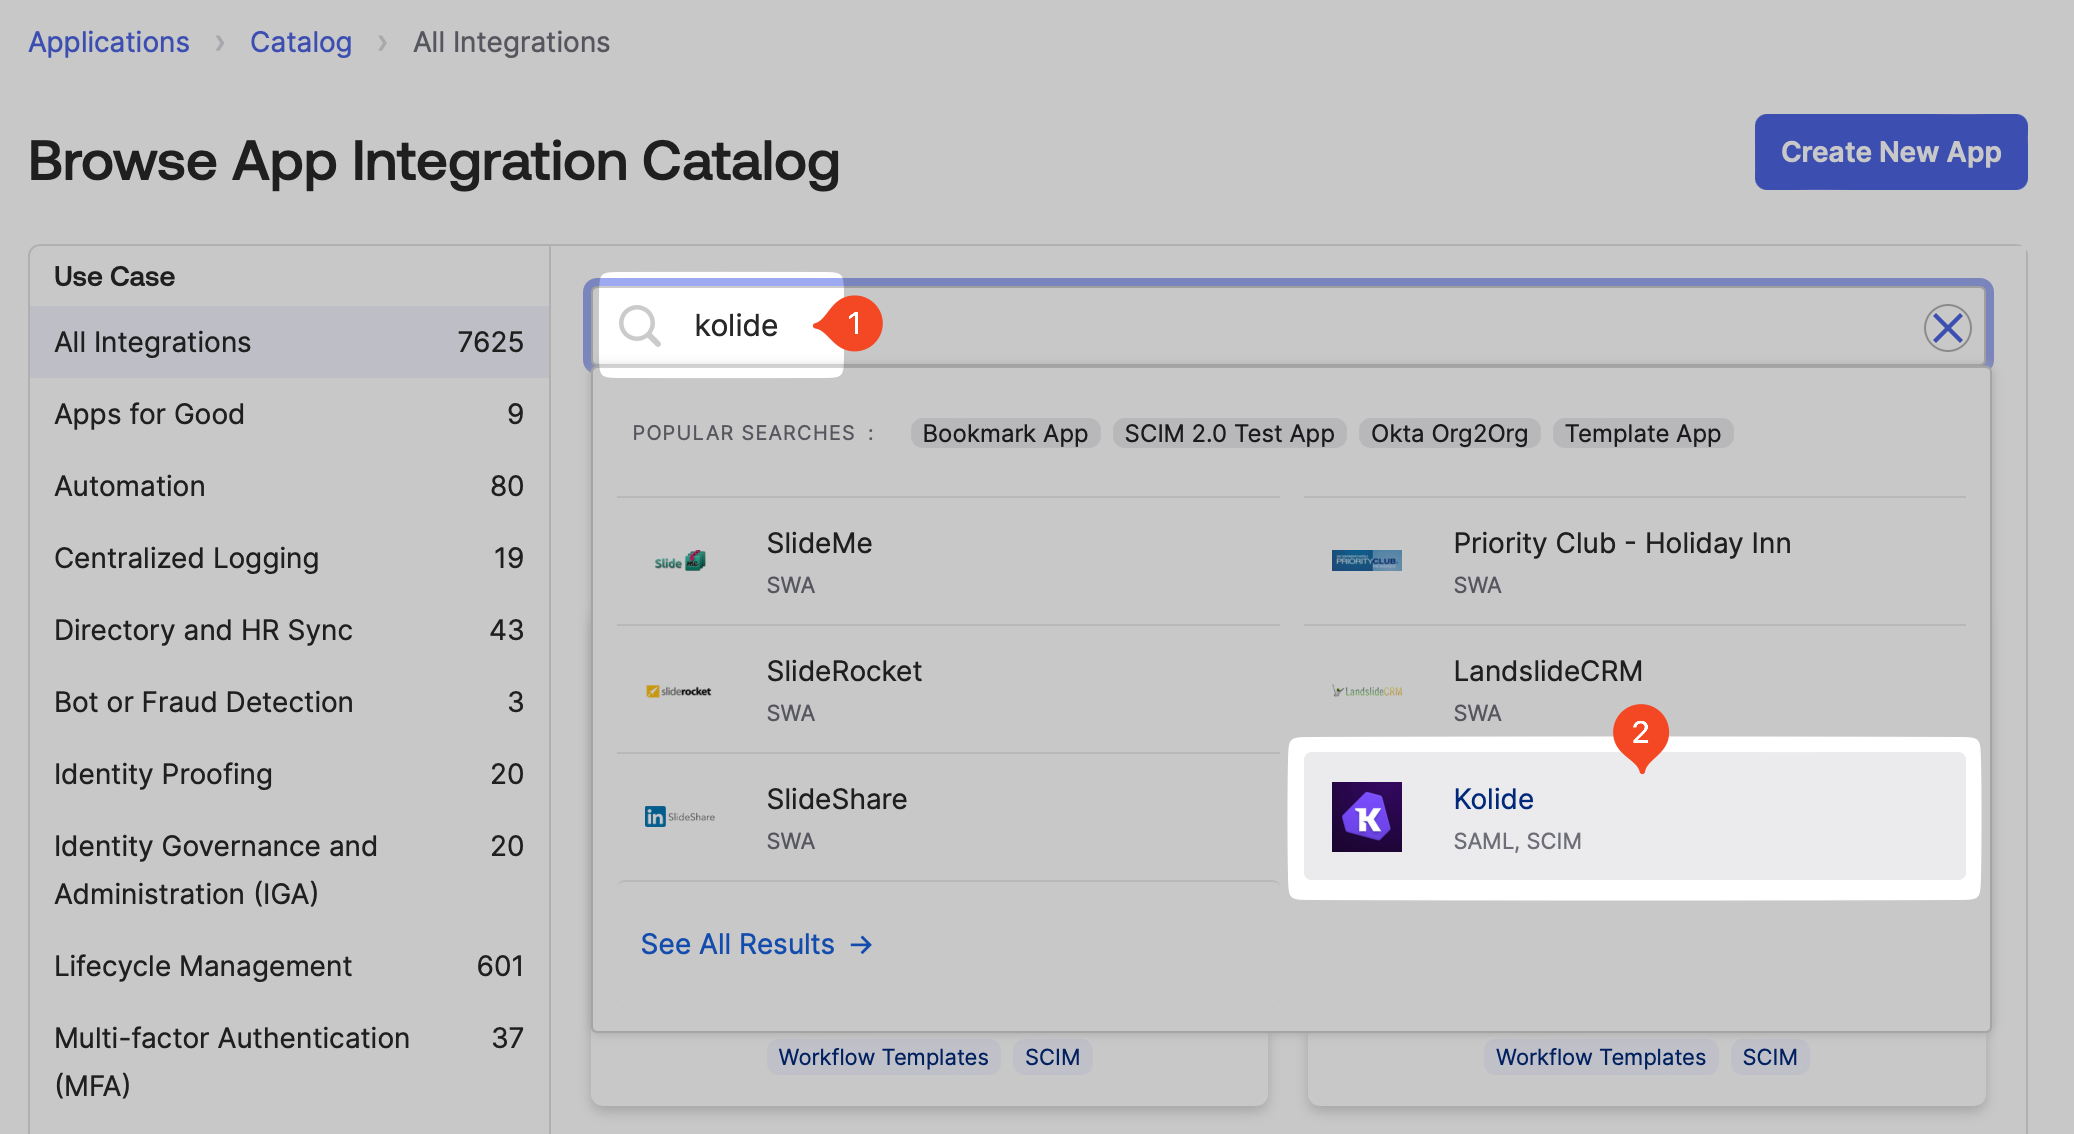
Search for “kolide” in the search bar, and then click the Kolide integration from the results.
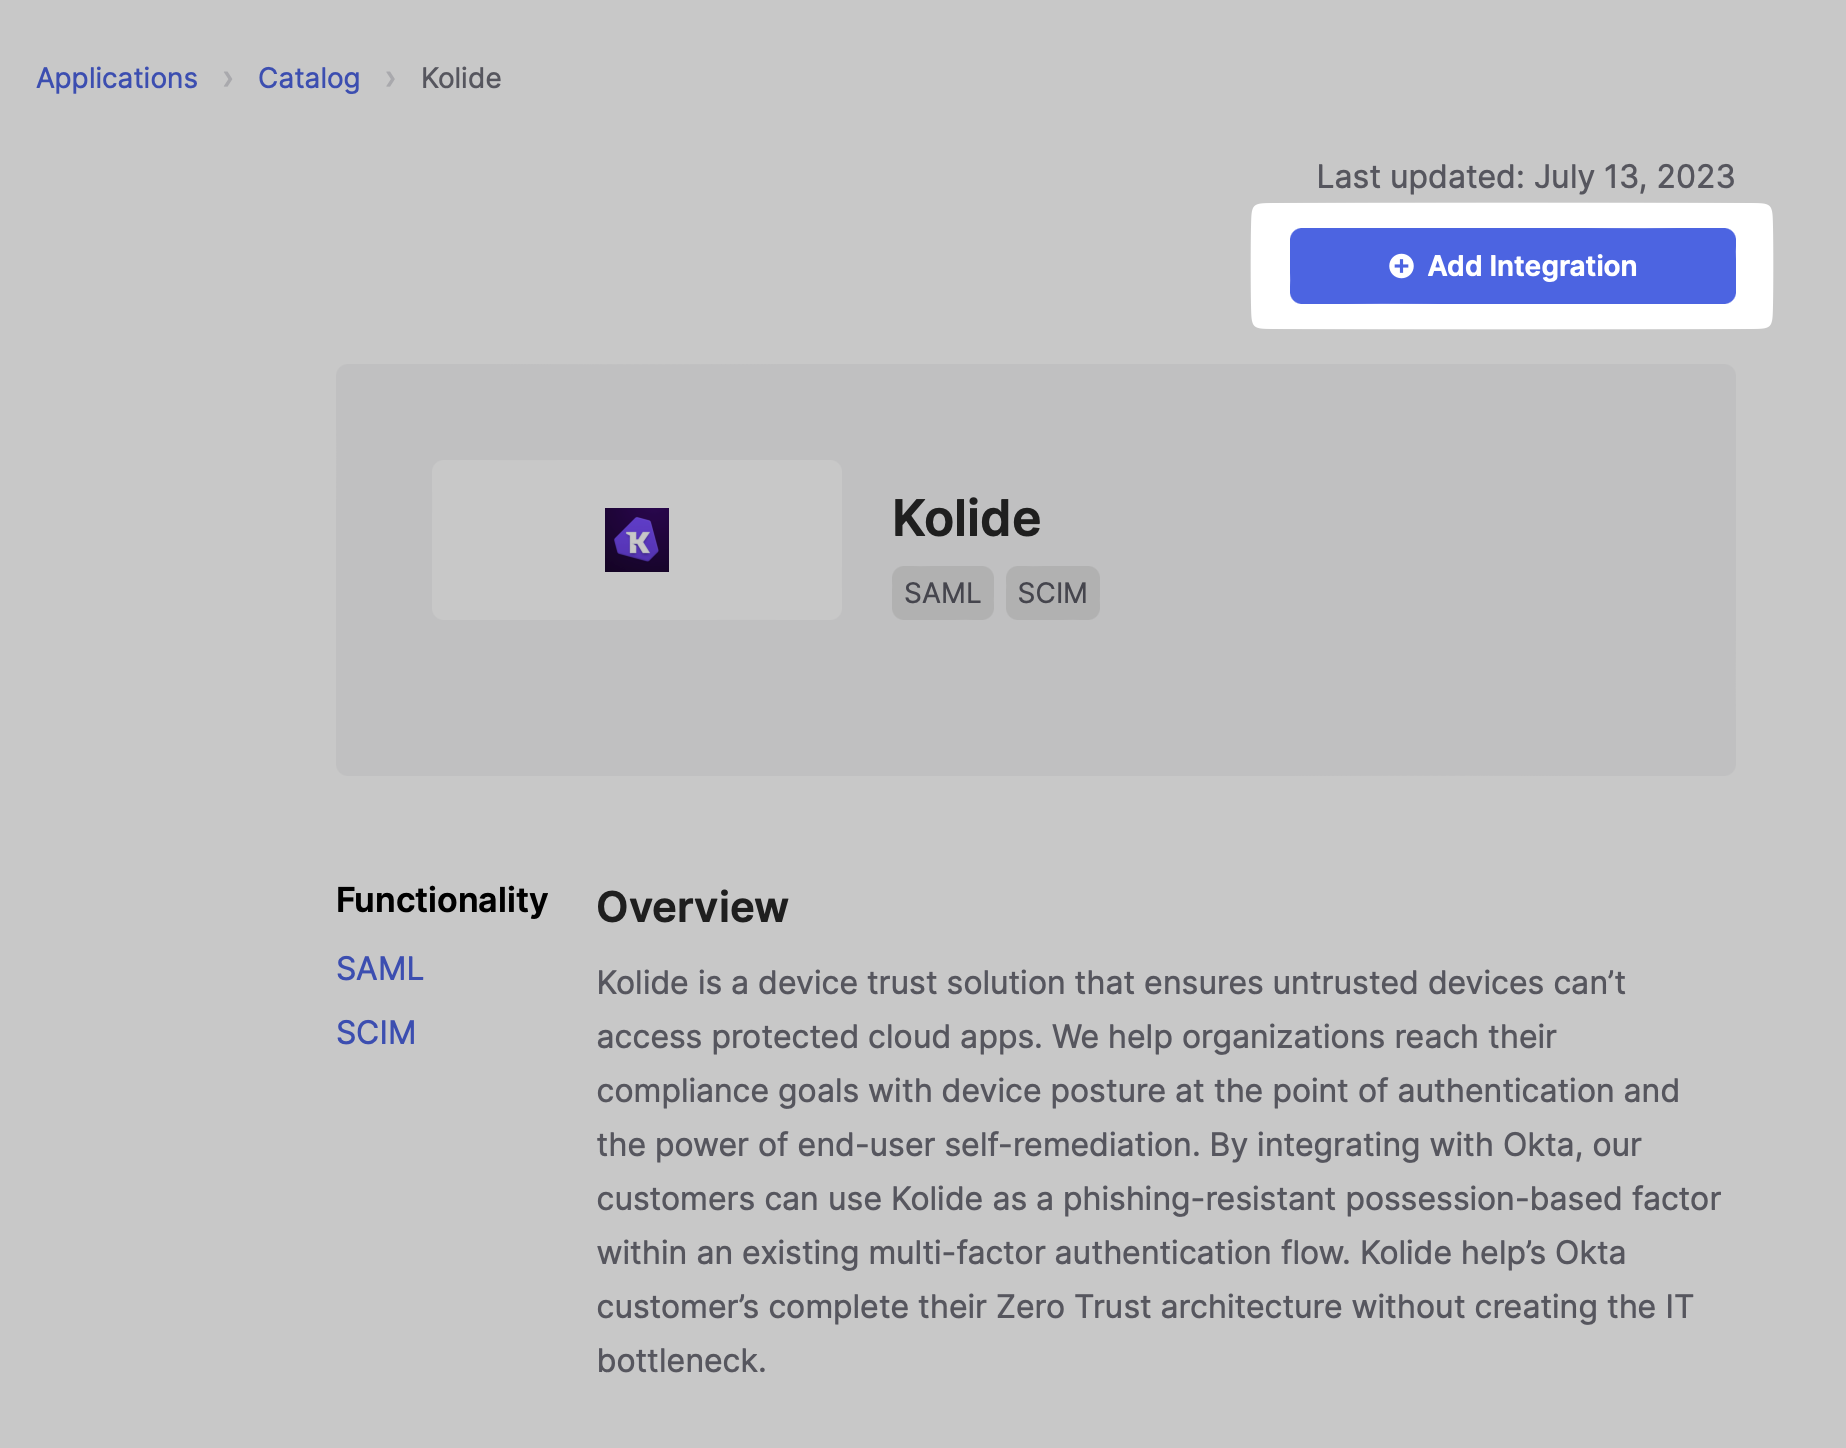
Click the Add Integration button to add the Kolide integration to your Okta instance.
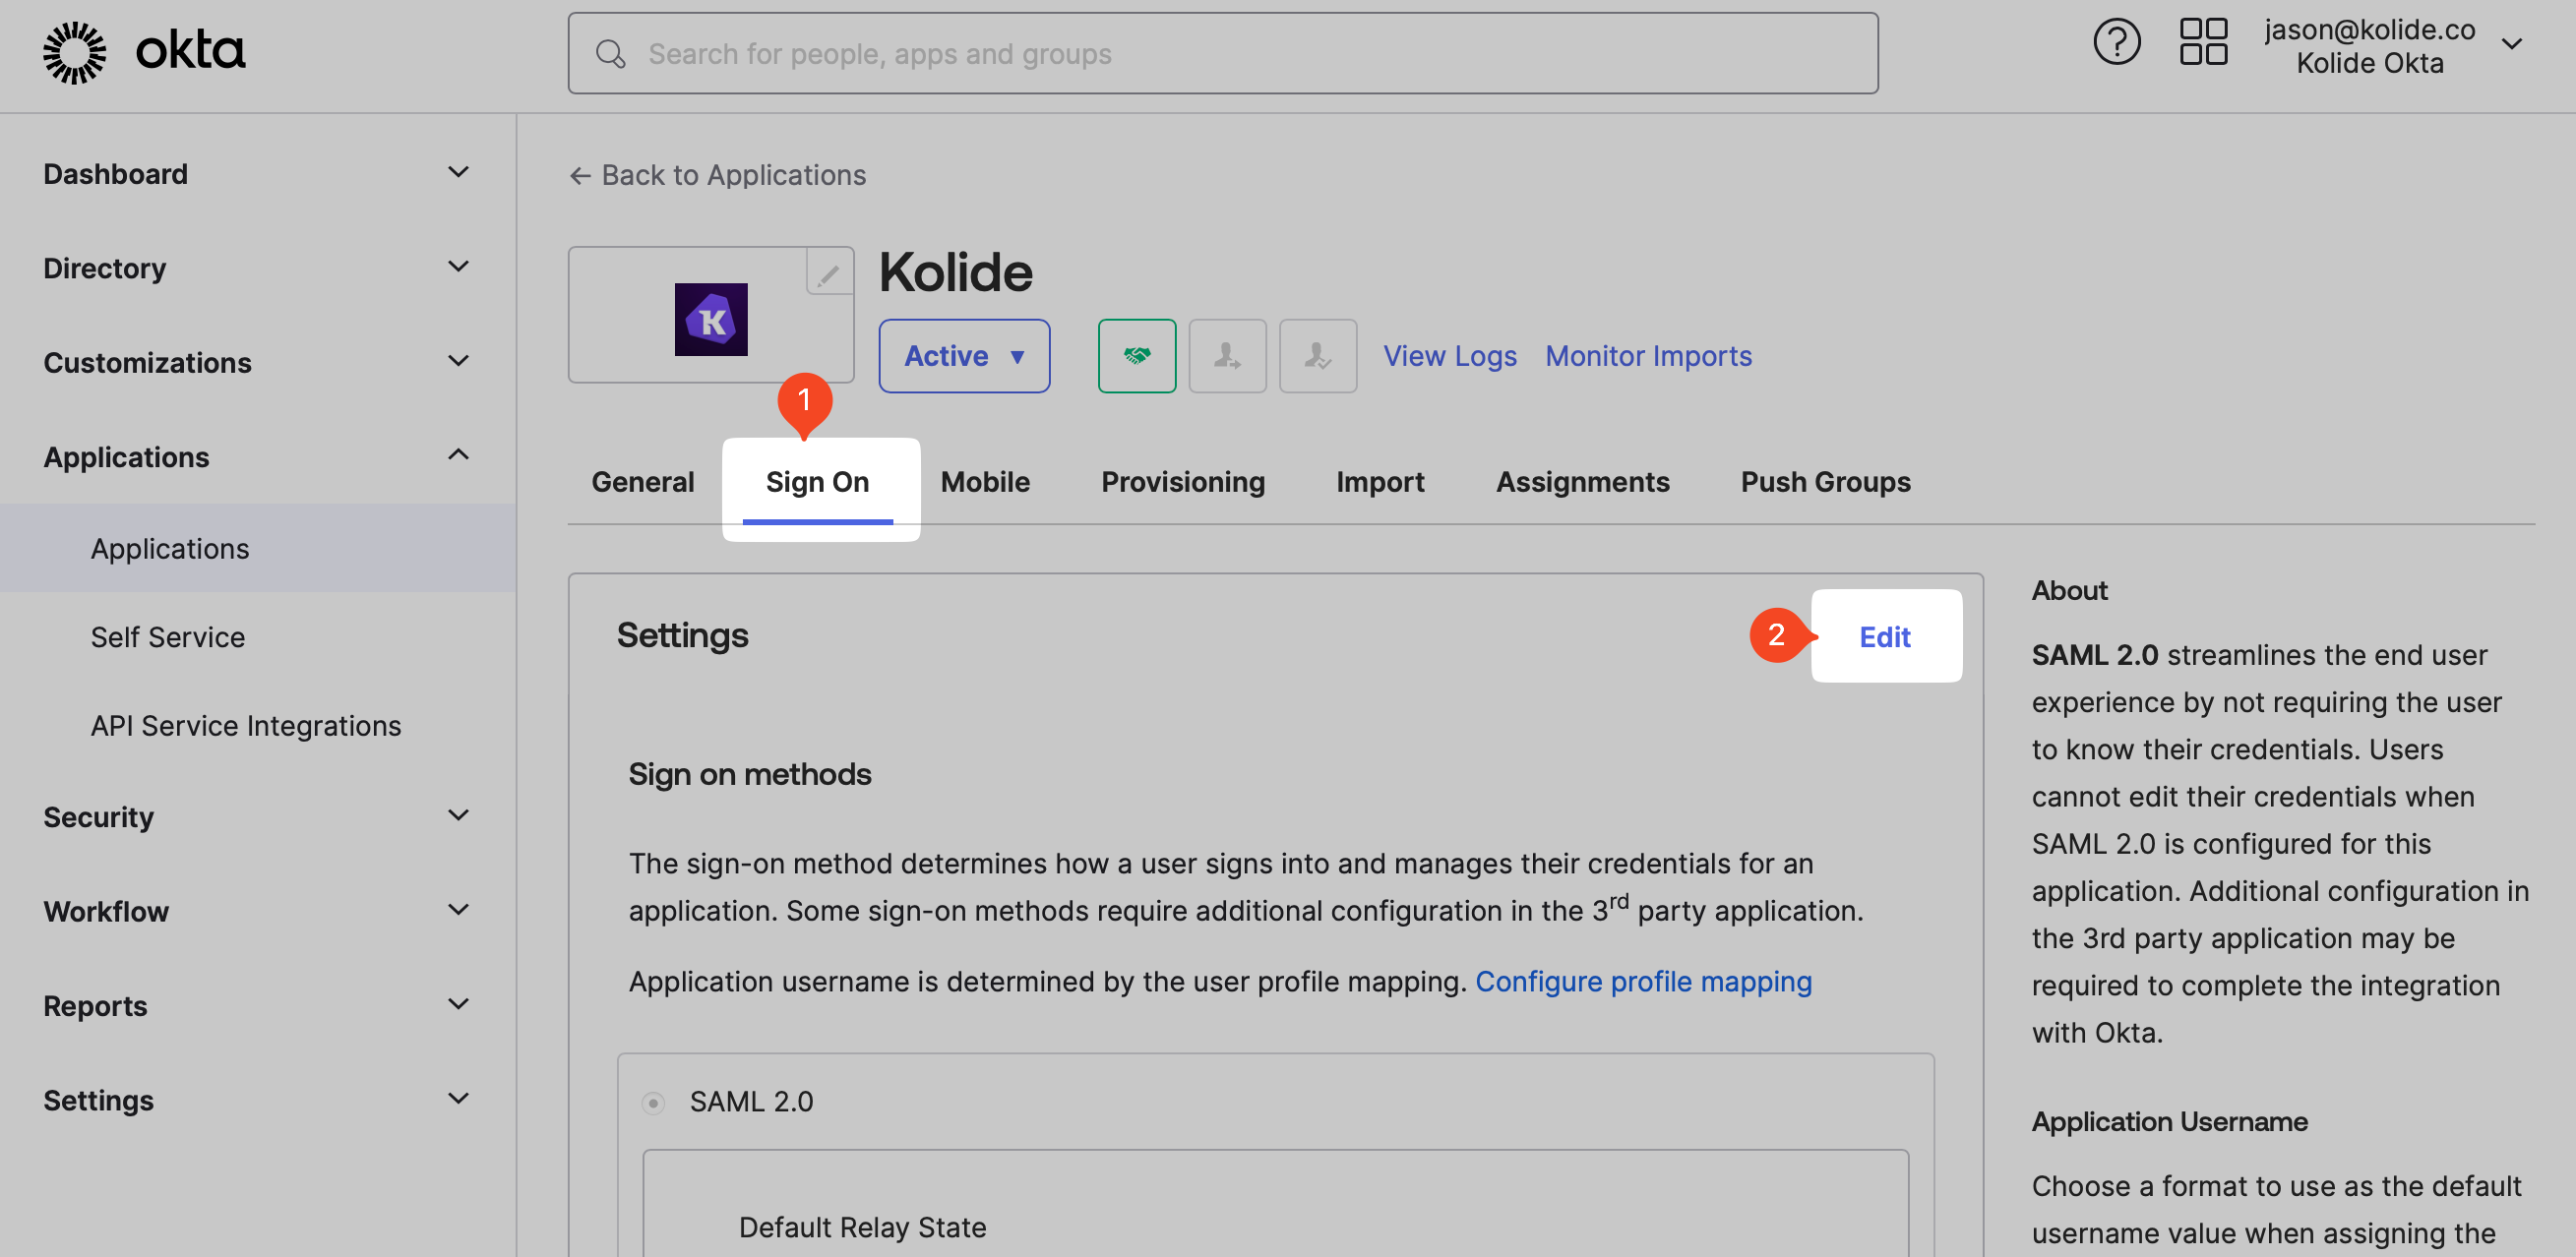
When the app integration is added to your Okta instance, you will be redirected to the applications assignments page. Click the Sign On tab then click the Edit link.
Scroll down to the Advanced Sign-on Settings section to the Customer ID field. Enter your Kolide Customer ID, and click the Save button.
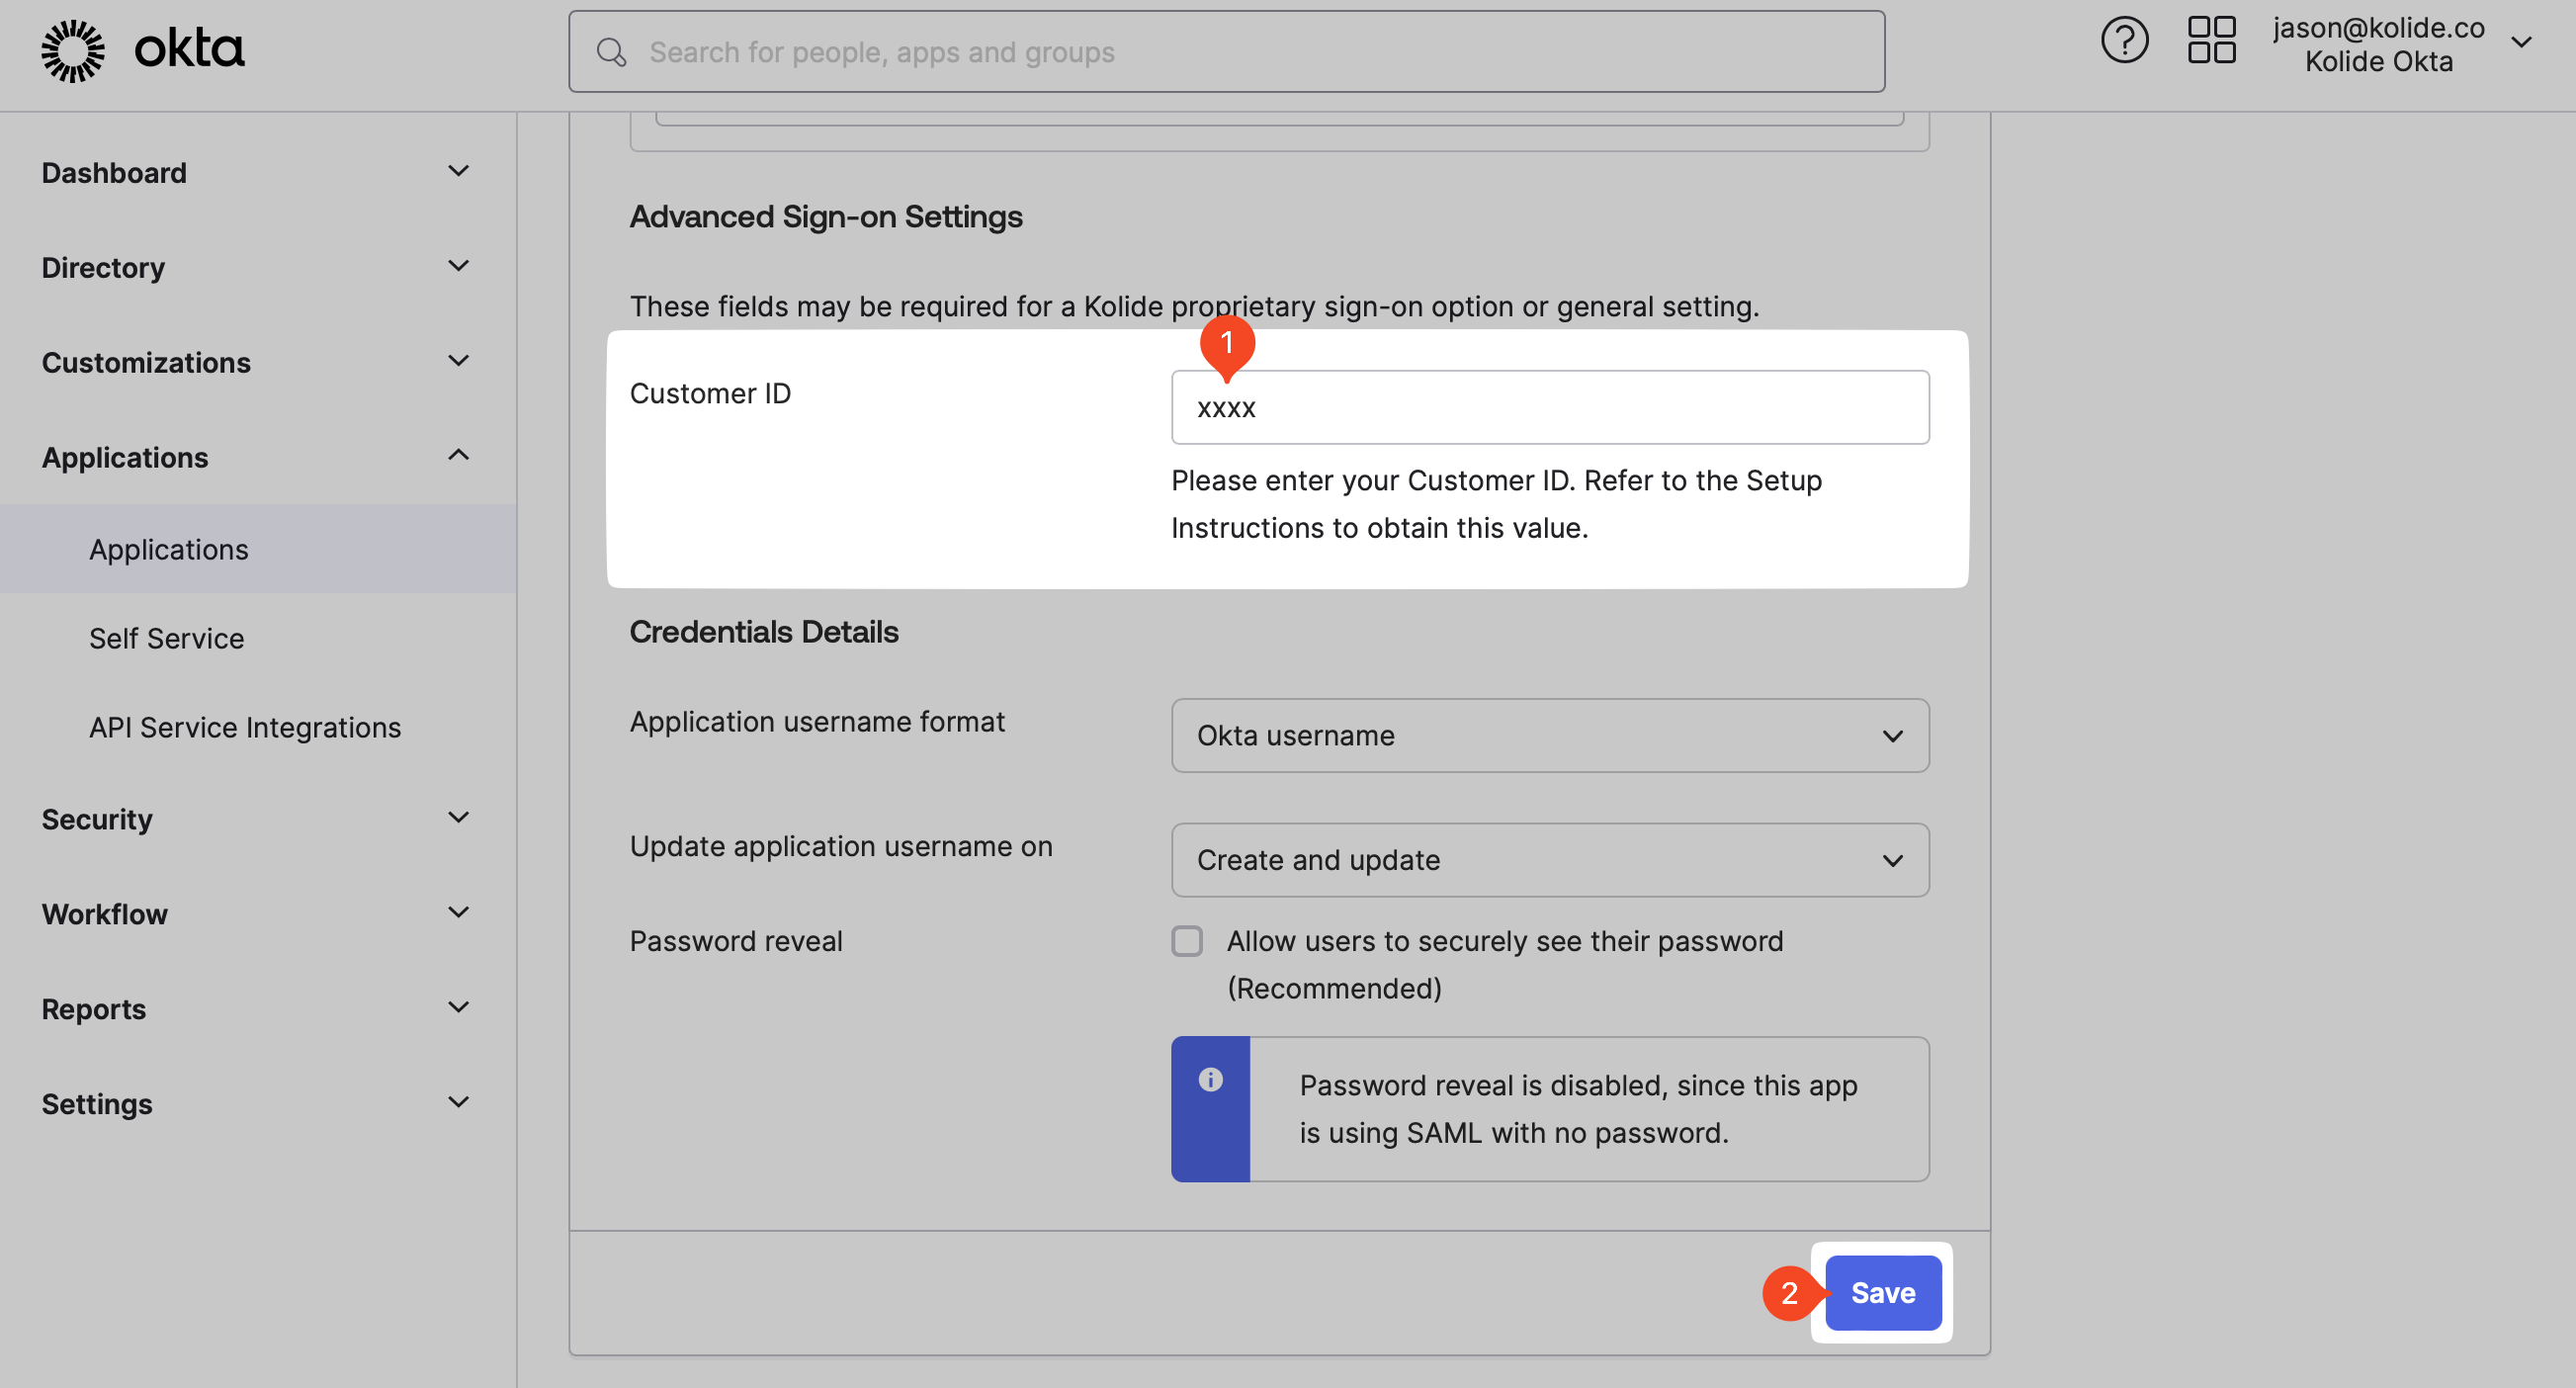
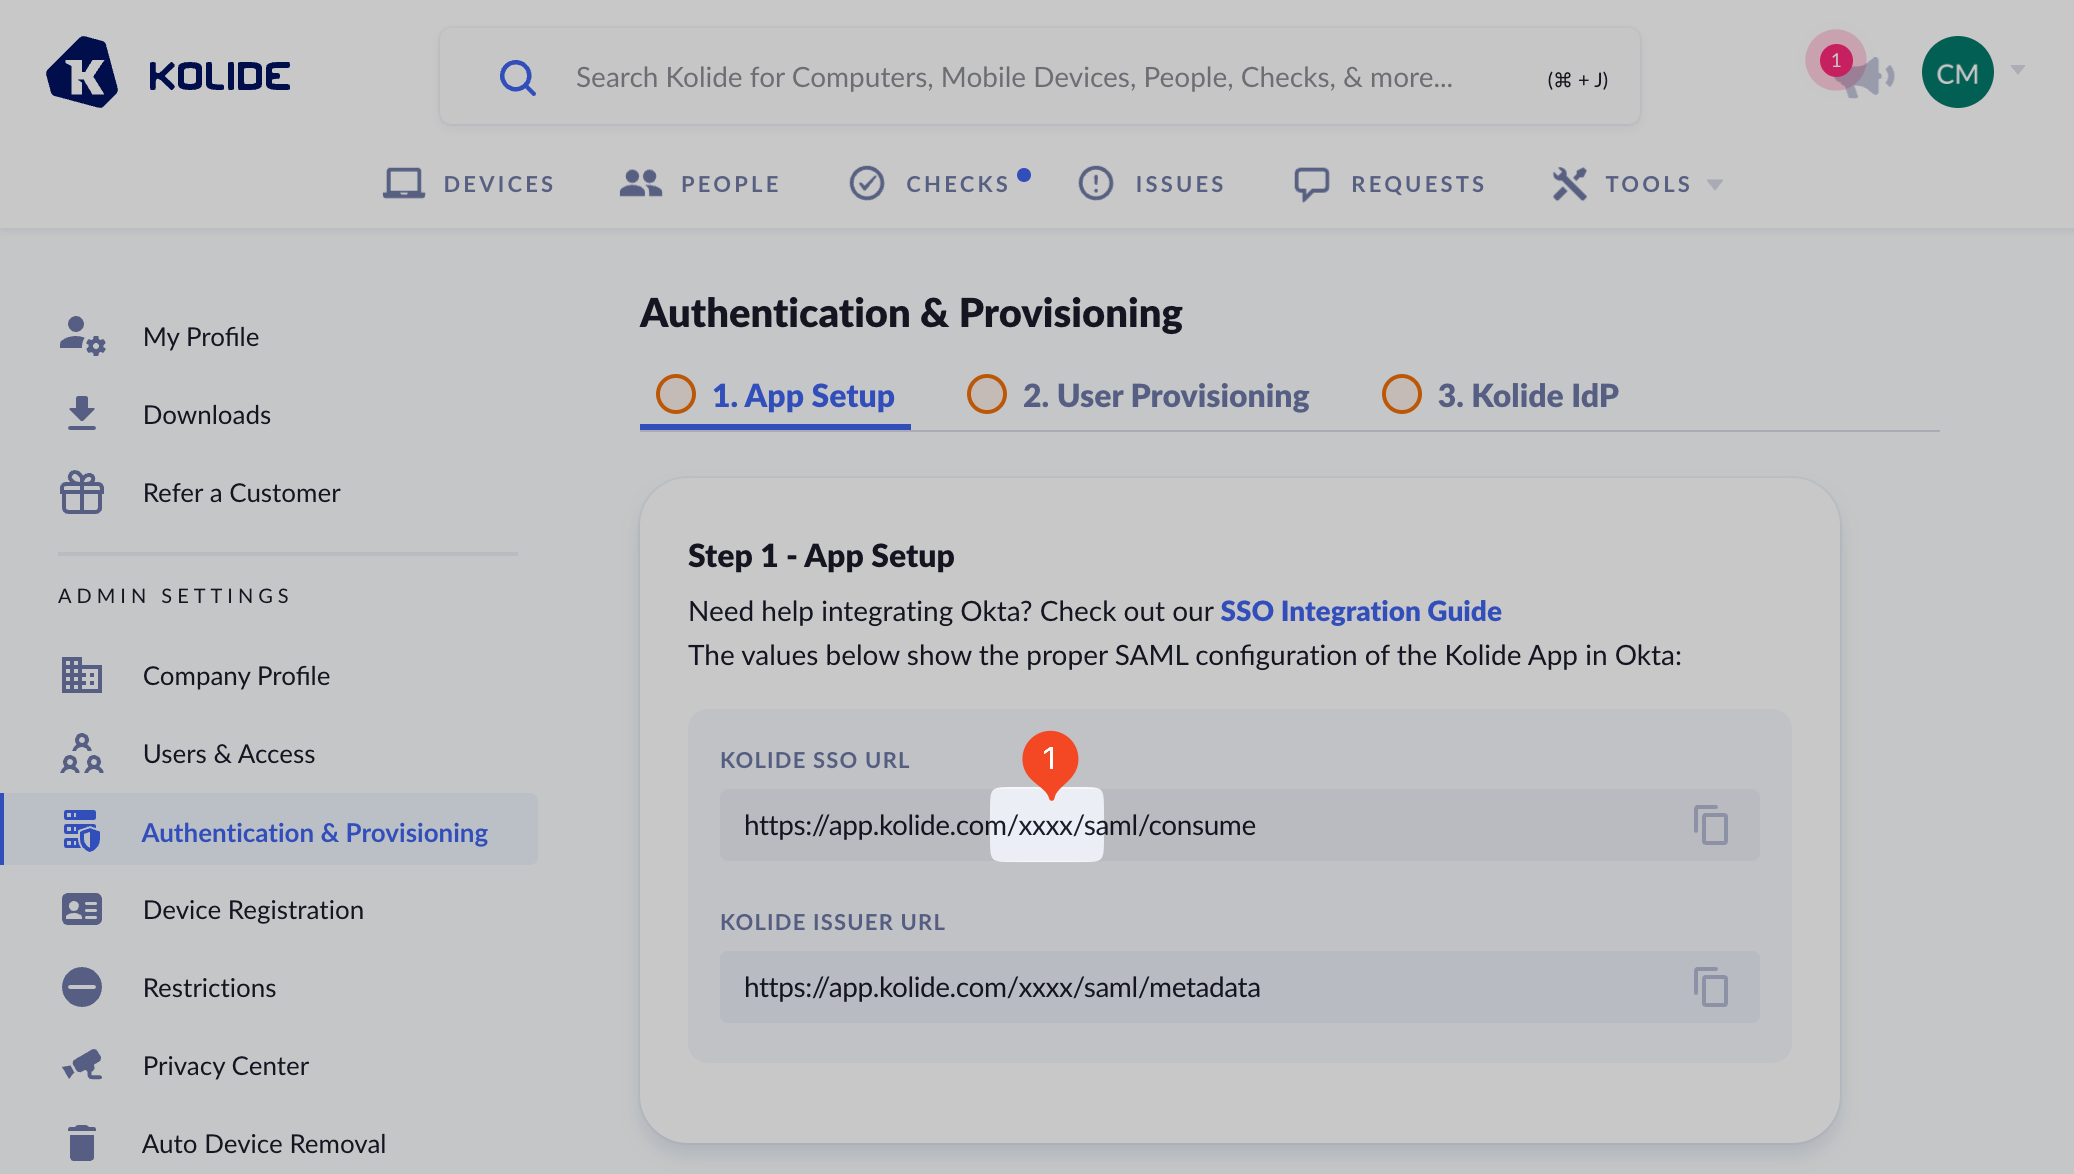
Your Kolide Customer ID may be found in the Step 1 - App Setup section of the Authentication & Provisioning settings page.
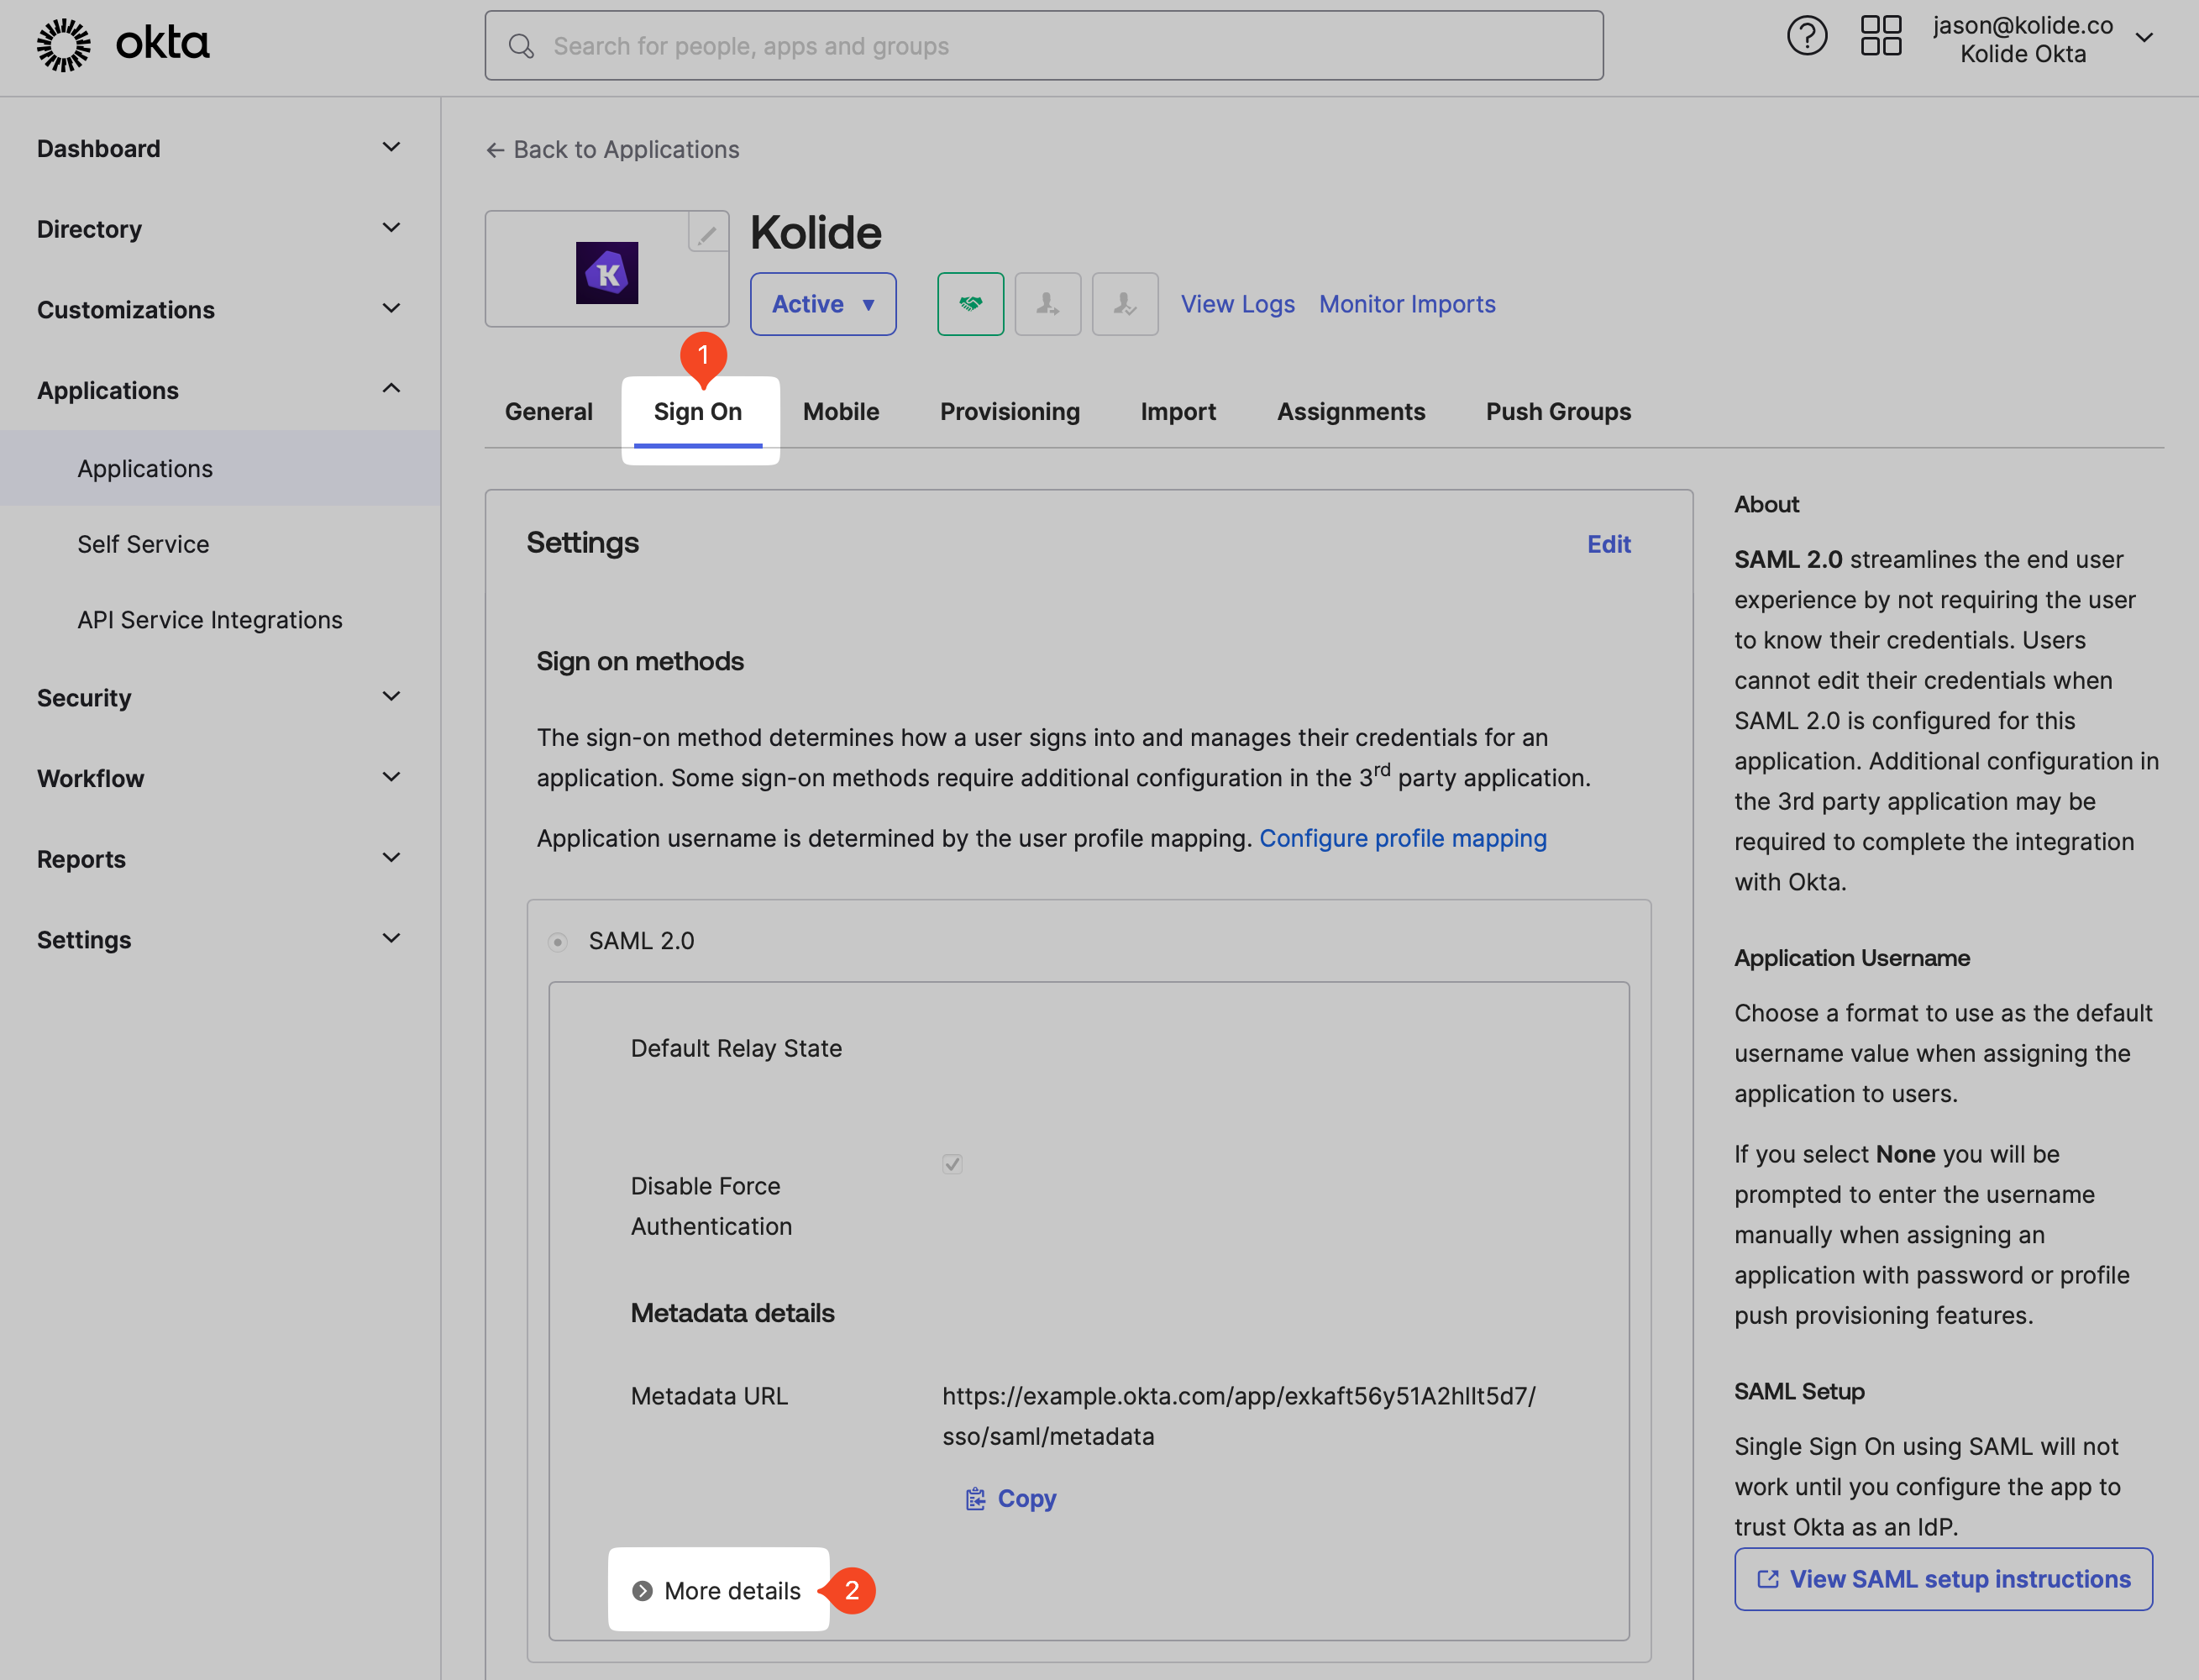
After updating the Customer ID, make sure you are still on the Sign On tab then click the More details disclosure under the SAML 2.0 Metadata details section.
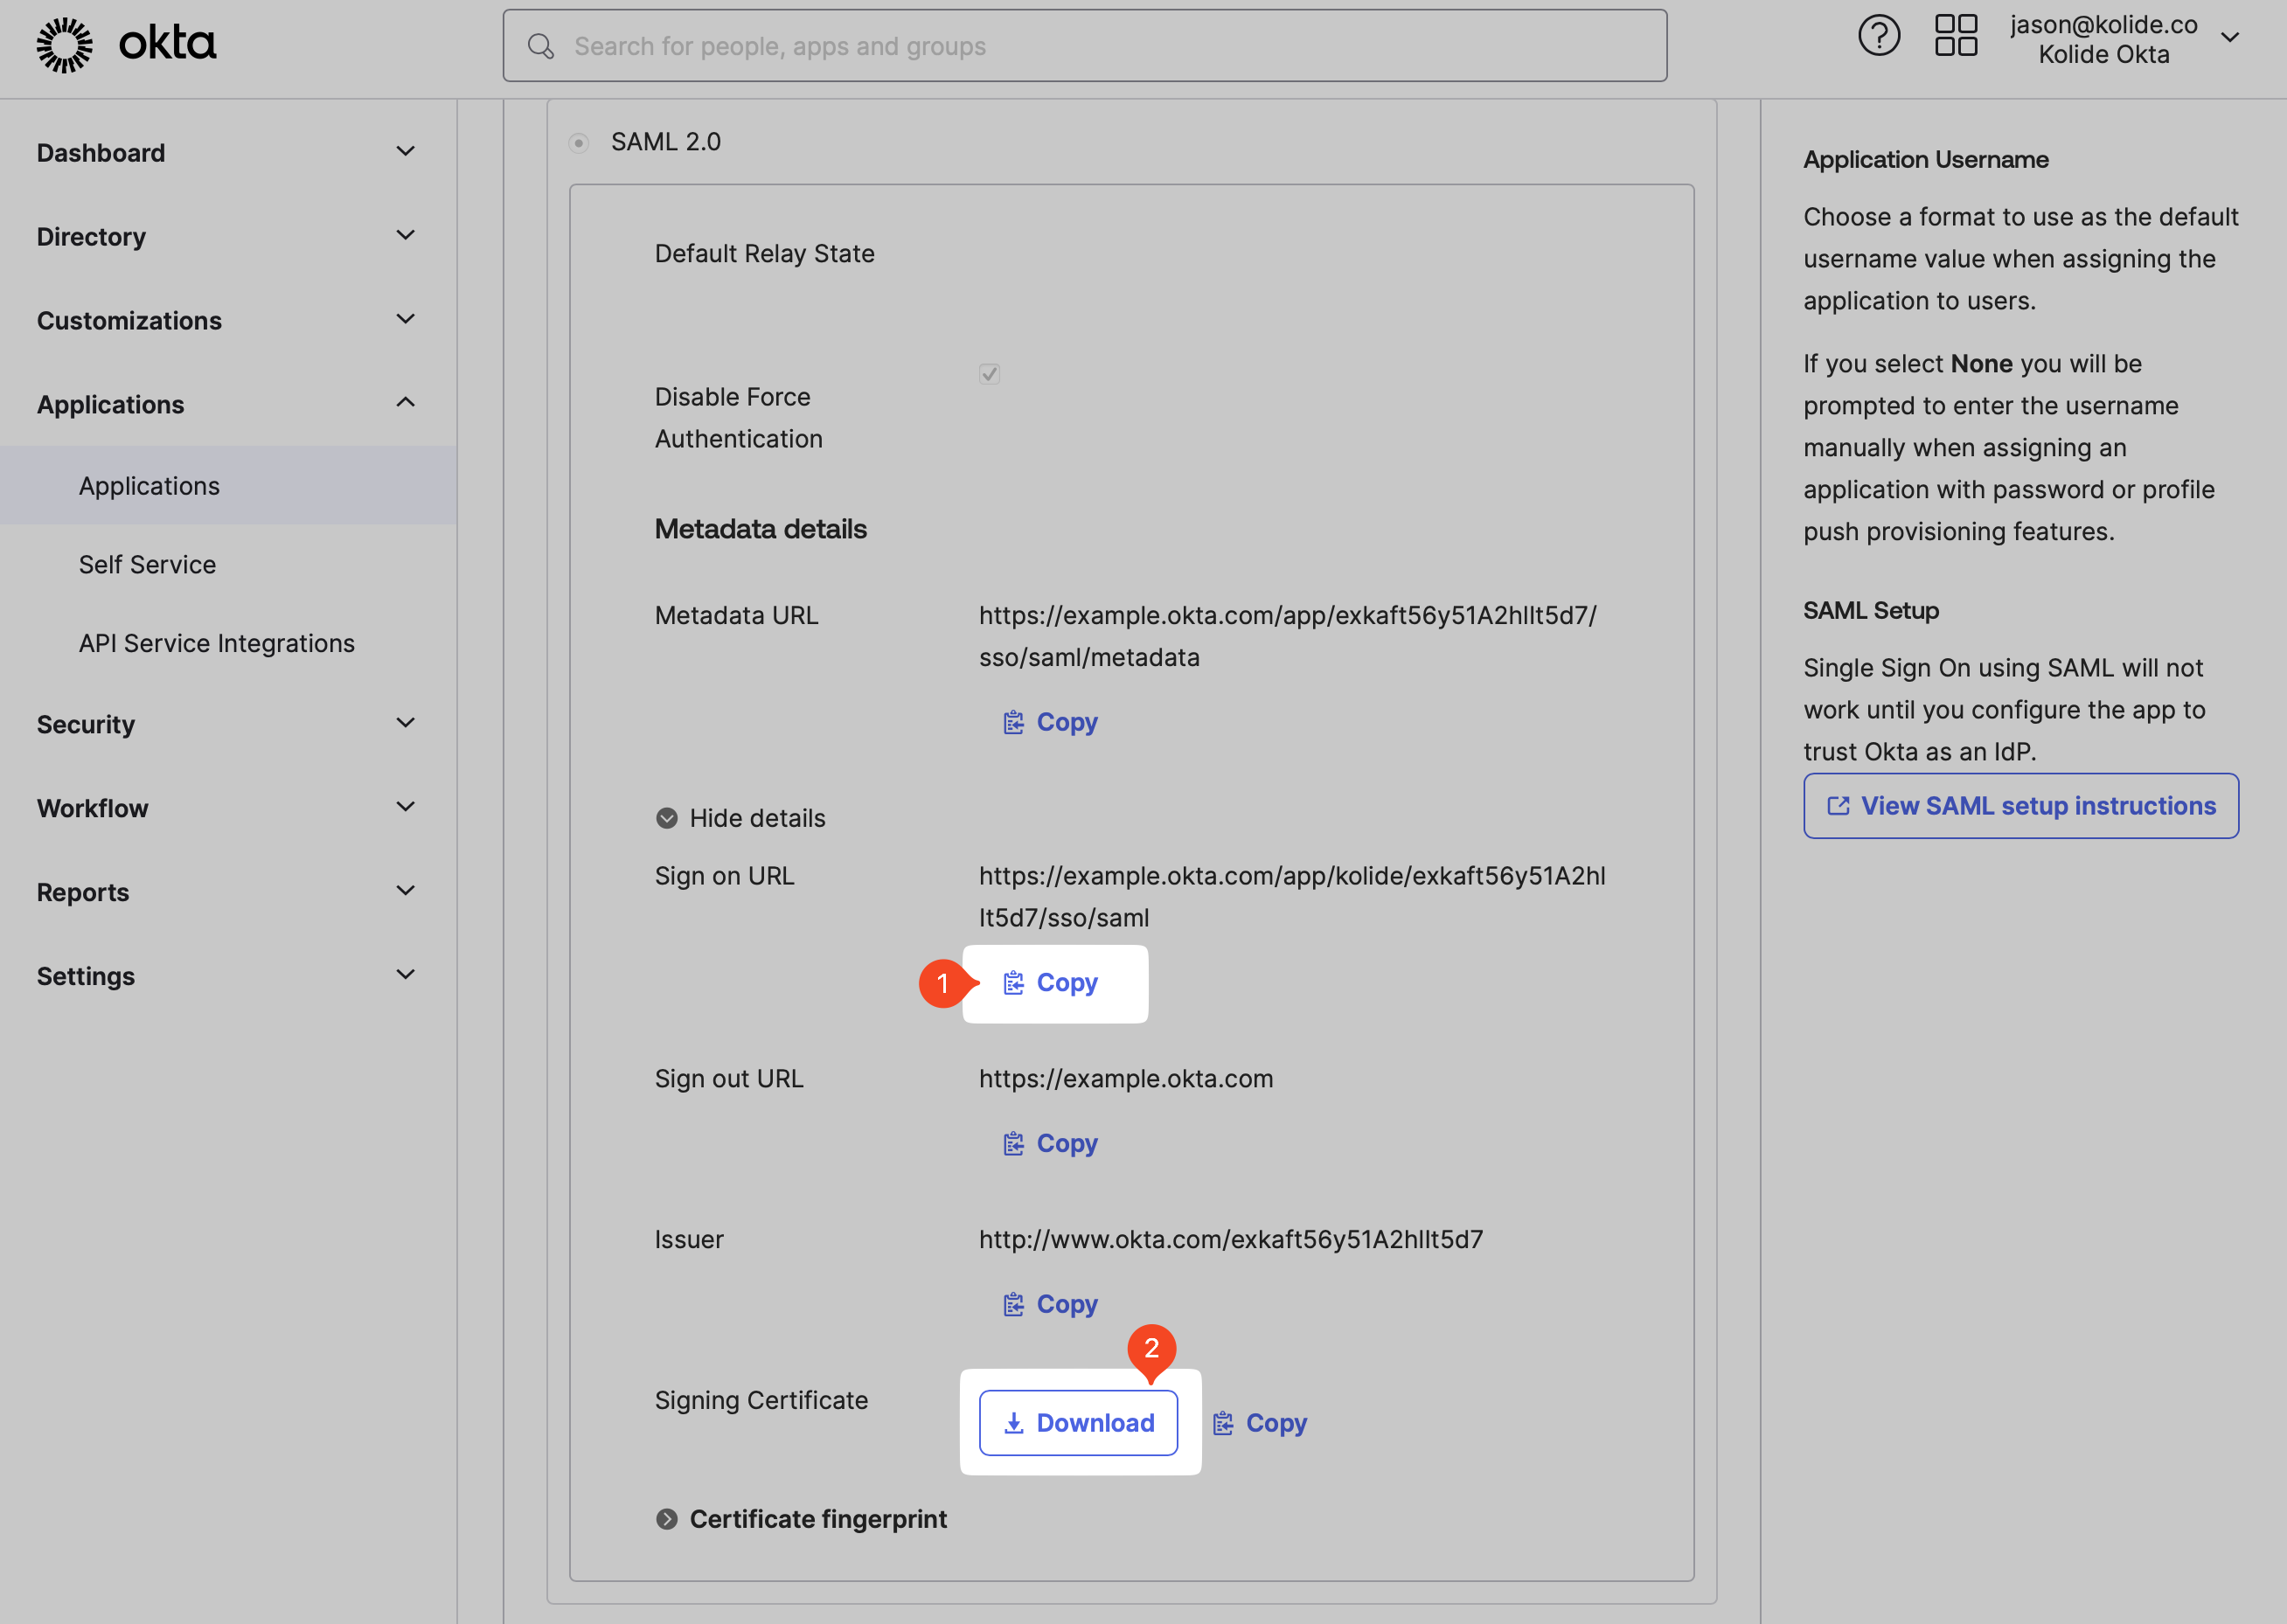
From the now revealed section, copy the Sign on URL and download the Okta Signing Certificate to your computer.
Then in Device Trust, paste Sign On URL value into the field labeled IDP SSO Target URL. Finally, upload the downloaded certificate by drag-and-dropping it into the X.509 Certificate field (don’t forget to delete it from your device once uploaded).
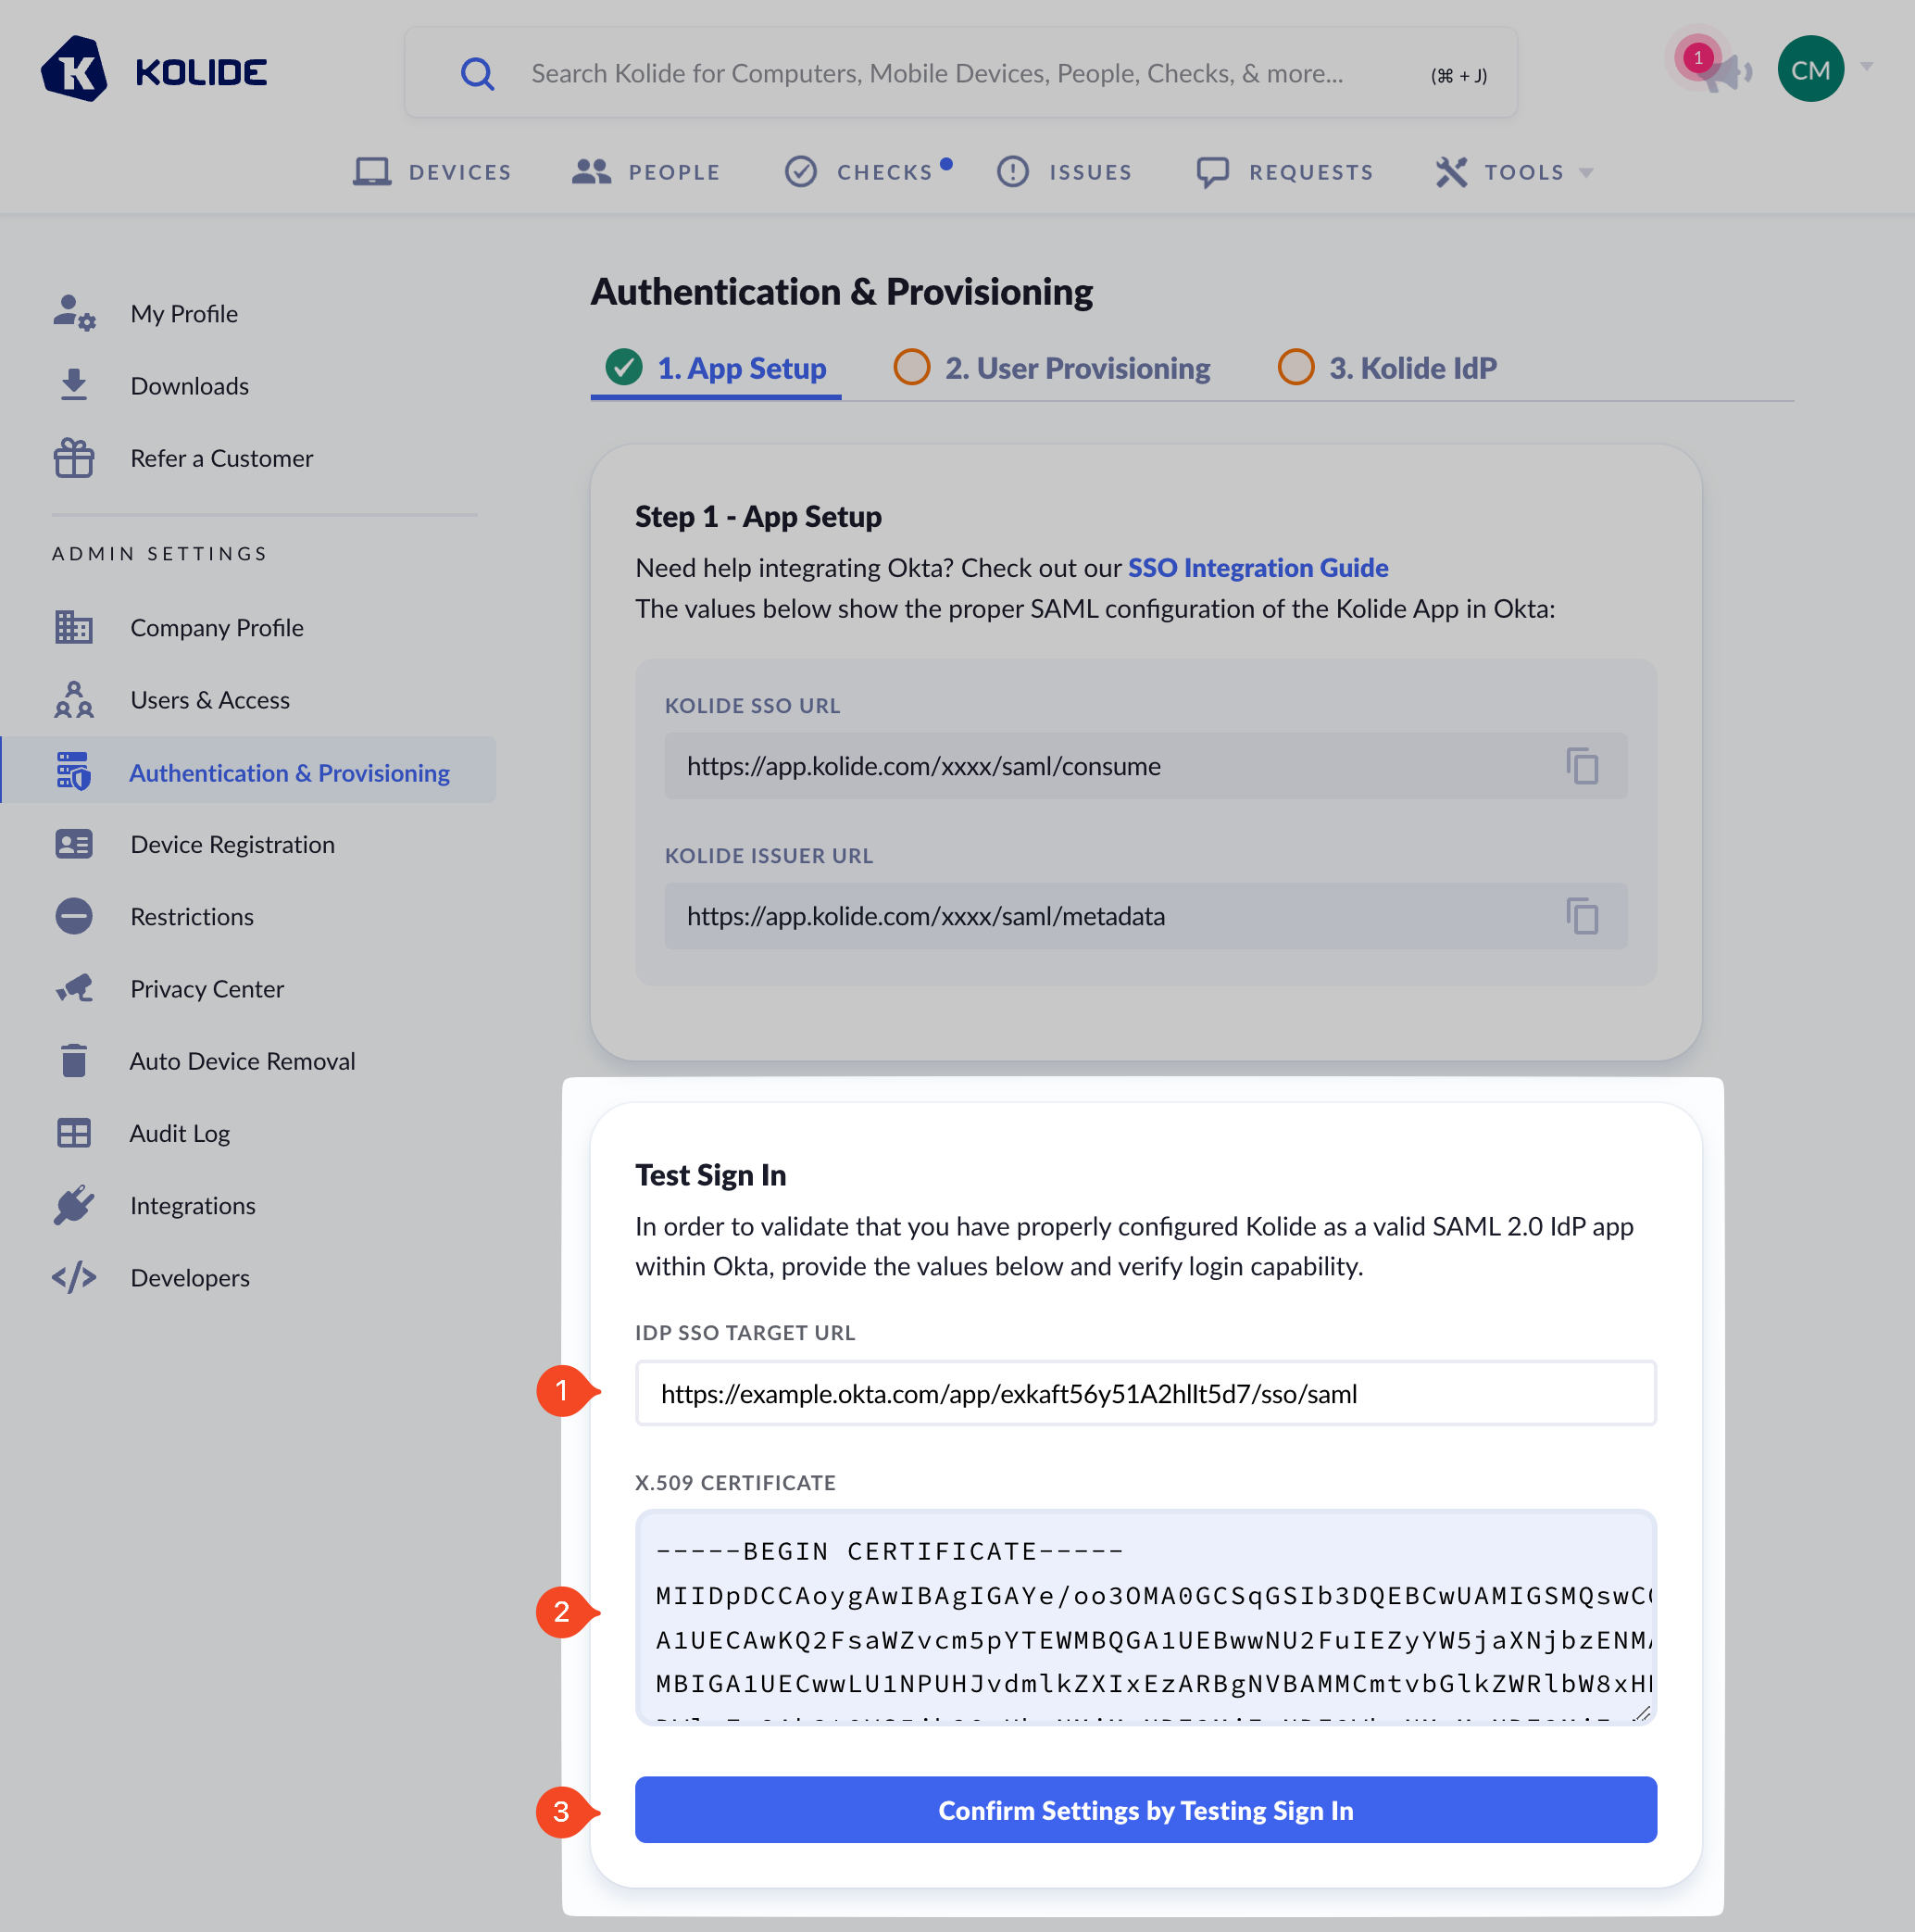
Next, click Confirm Settings by Testing Sign In and complete the authentication process to complete this step.
Was this article helpful?
Glad to hear it! If you have anything you'd like to add, feel free to contact us.
Sorry to hear that. Please contact us if you'd like to provide more details.